blog
Learn how to get a blue checkmark for your email in Gmail with BIMI and logos.
Gmail now supports BIMI and verified logos. This guide shows you how to get a blue checkmark for your email address in Gmail.
Your Step-by-Step Guide to Getting a Verified Email Address in Gmail!
Have you ever wondered how to get that blue checkmark next to your email address in Gmail? It signifies that your email address has been verified and you are authorized to use a particular brand logo. This blog post will explain how to achieve this, ensuring that your email recipients can trust your correspondence.
Gmail uses a combination of three standards to determine the credibility of your email: BIMI (Brand Indicators for Message Identification), VMC (Verified Mark Certificate), and DMARC (Domain-based Message Authentication, Reporting, and Conformance). Let's break down how these standards work and how they help in getting your email verified.
1. BIMI (Brand Indicators for Message Identification)
BIMI is an open standard that allows you, the email sender, to use your brand logo in emails. It boosts confidence in the source of emails, providing assurance to your recipients that the email genuinely originates from your brand. Here's how to use BIMI:
-
Step 1: Create a BIMI record: This involves creating a text file that includes your logo in SVG format.
-
Step 2: Publish the BIMI record on your domain's DNS (Domain Name System): This allows email servers to find and verify your logo.
2. VMC (Verified Mark Certificate)
A Verified Mark Certificate is a digital certificate that verifies the ownership of a logo. It's issued by a certificate authority and provides a guarantee that the logo used is owned by the sender. To get a VMC:
-
Step 1: Choose a certificate authority that offers VMCs.
-
Step 2: Submit your logo and the necessary documents to prove your logo ownership.
-
Step 3: Once verified, the certificate authority will provide you with a VMC.
3. DMARC (Domain-based Message Authentication, Reporting, and Conformance)
DMARC helps email security systems distinguish genuine messages from potential spoofs, reducing phishing risks. To enable DMARC:
-
Step 1: Set up SPF (Sender Policy Framework) and DKIM (Domain Keys Identified Mail) protocols on your email servers. These are email validation systems designed to detect email spoofing.
-
Step 2: Create a DMARC record, which is a policy that states how your domain handles suspicious emails.
-
Step 3: Publish the DMARC record on your domain's DNS.
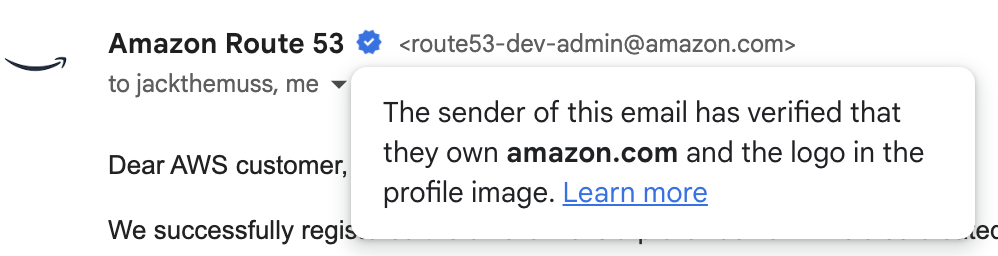
After successfully applying these standards, your emails will undergo Gmail's regular anti-abuse checks. Once they pass these checks, your verified brand logo will be displayed, and a blue checkmark will appear next to your name, confirming that the message is authenticated and authorized to display your brand logo.
To verify whether a message has been validated through BIMI, DMARC, and VMC, look for the blue checkmark next to the sender's name. By pointing to the checkmark, you can access additional information about the sender's domain.
Verified sender indicators can help recipients recognize legitimate brand email. Use BIMI, DMARC, and VMC together, then test messages before launch so authentication, logo display, and deliverability behave as expected.