guides
Send emails in Laravel using Mailable or Notification (test with Dusk)
Configure Laravel PHP projects with MailSlurp mailservers to send and receive email in code and tests.
Laravel is a very popular PHP framework with the built-in ability to send email. This tutorial demonstrates how to use two different email techniques in Laravel to send mail: Mailable and Notification. It then shows how to test that emails are sent correctly using Dusk and MailSlurp fake mail catchers.
Tutorial basics
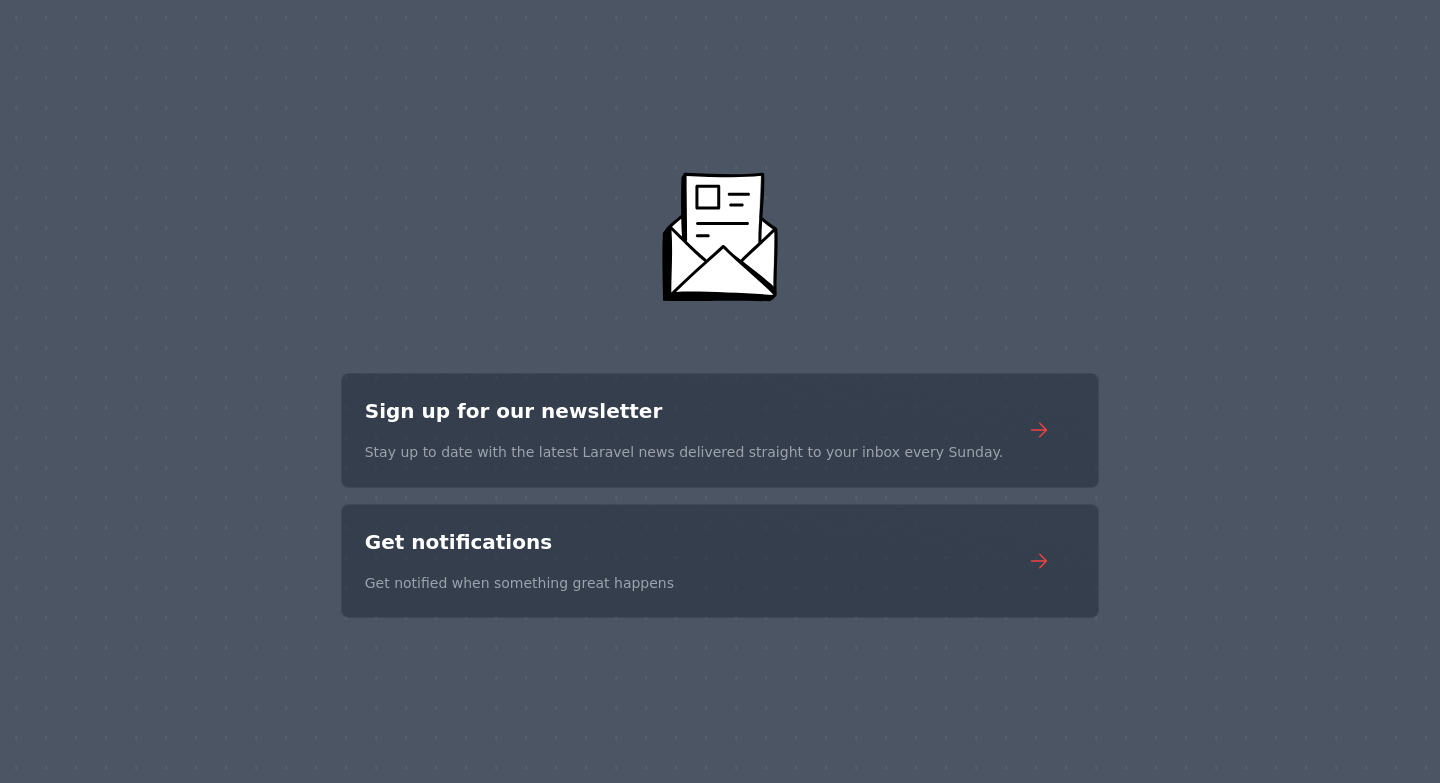
To illustrate email sending in Laravel let us create a demo app that allows users to sign up for a newsletter using a form and select to be emailed using Mailable or Notification techniques. We will then write Dusk browser tests using Chrome and MailSlurp disposable email addresses to capture the outbound email and verify the results. This is what our project will look like:
When the user visits our site they will be given the choice to sign up to receive an email newsletter. For demonstration purposes we'll make two implementations, one using Mailable and another using Notifications. Full code can be found on the github examples repository.
Notifcations vs Mailable
Laravel provides two primary ways to send notifications to users: Mailables and Notifications. Here's a brief comparison:
| Aspect | Mailables | Notifications |
|---|---|---|
| Purpose | Designed specifically for email communication | Designed for quick, simple messages that can be sent via various channels |
| Customization | Provides flexibility for complex email layouts and designs | Offers customization focused on the message content rather than design |
| Delivery channels | Restricted to the email channel | Supports multiple channels, including mail, database, broadcast, SMS (via Nexmo), and Slack |
| Queue | Can be queued for background sending | Can also be queued for background sending |
| Complexity | Might be a bit more complex to set up initially, especially with complex designs | Typically simpler to set up, particularly if you're using multiple channels |
Notifications and Mailables both have their uses. In this post we will show to how use and test both of them.
Setting up a project
Let's assume you have an existing Laravel project with composer. If not create one with:
php composer.phar create-project laravel/laravel php-laravel-phpunit
Then add the MailSlurp library so we can use email addresses. You need an API Key so create a free account to obtain one:
php composer.phar require --dev mailslurp/mailslurp-client-php
Then configure dusk to enable browser testing:
php composer.phar require --dev laravel/dusk
php artisan dusk:install
php artisan dusk:chrome-driver --detect
We can add a basic welcome page with a link to our two different sign up methods (Mailable and Notification):
The buttons link to /newsletter and /notification respectively.
Configure mail settings
Before we can send emails we need to configure PHP mail settings. Laravel sends email using an external SMTP mailserver. We can configure this inside .env or config/mail.php.
Using .env
If you have created an inbox in MailSlurp then you can use the SMTP access details provided in the MailSlurp dashboard to configure the SMTP credentials inside .env
MAIL_MAILER=smtp
MAIL_HOST=mailslurp.mx
MAIL_PORT=2587
MAIL_USERNAME=your-smtp-username
MAIL_PASSWORD=your-smtp-password
MAIL_FROM_ADDRESS="your-inbox@mailslurp.com"
The disadvantage of this approach is that the settings are static. For this example we will use config/mail.php instead which allows dynamic configuration.
Using config/mail.php
For this example we want to use create and use a new MailSlurp inbox for sending within the app. We can use the MailSlurp API client inside mail.php to configure these settings:
// configure mailslurp client
$config = MailSlurp\Configuration::getDefaultConfiguration()->setApiKey('x-api-key', $MAILSLURP_API_KEY);

// create an inbox to send emails from
$inboxController = new MailSlurp\Apis\InboxControllerApi(null, $config);
$senderInbox = $inboxController->createInboxWithOptions(new \MailSlurp\Models\CreateInboxDto(['inbox_type' => 'SMTP_INBOX', 'name' => 'Newsletters']));
$accessOptions = $inboxController->getImapSmtpAccess($senderInbox->getId());

// get access to the inbox
$host = $accessOptions->getSecureSmtpServerHost();
$port = $accessOptions->getSecureSmtpServerPort();
$username = $accessOptions->getSecureSmtpUsername();
$password = $accessOptions->getSecureSmtpPassword();

// configure laravel mailer settings to use our sender inbox
// for production apps set this in .env instead with static values
// make sure you run `API_KEY=$(API_KEY) php artisan config:cache` after setting
return [
    'default' => 'smtp',
    'mailers' => [
        'smtp' => [
            'transport' => 'smtp',
            'url' => env('MAIL_URL'),
            'host' => $host,
            'port' => $port,
            'encryption' => 'tls',
            'username' => $username,
            'password' => $password,
            'timeout' => null,
            'local_domain' => env('MAIL_EHLO_DOMAIN'),
        ],
    ],
    'from' => [
        'address' => $senderInbox->getEmailAddress(),
        'name' => $senderInbox->getName(),
    ],
    'markdown' => [
        'theme' => 'default',
        'paths' => [
            resource_path('views/vendor/mail'),
        ],
    ],
];
Note that each time you change the config you need to run:
php artisan config:cache
Create a Mailable
To send email using Mailables we can scaffold a class:
php artisan make:mail Newsletter
Inside the class we define which view we will use:
namespace App\Mail;

use Illuminate\Bus\Queueable;
use Illuminate\Mail\Mailable;
use Illuminate\Mail\Mailables\Content;
use Illuminate\Mail\Mailables\Envelope;
use Illuminate\Queue\SerializesModels;

class Newsletter extends Mailable
{
    use Queueable, SerializesModels;

    /**
     * Get the message envelope.
     */
    public function envelope(): Envelope
    {
        return new Envelope(
            subject: 'Newsletter',
        );
    }

    /**
     * Get the message content definition.
     */
    public function content(): Content
    {
        return new Content(
            view: 'emails.newsletter',
        );
    }
}
For the view we used emails.newsletter - this means we need to define a blade template view in resources/views/emails/newsletter:
<!DOCTYPE html>
<html lang="en">
<head>
    <title>Welcome Email</title>
    <link rel="stylesheet" href="https://cdn.jsdelivr.net/npm/@picocss/pico@1/css/pico.min.css">
</head>
<body>
<h1>Welcome to our newsletter!</h1>
<p>We are glad you have decided to join us.</p>
</body>
</html>
This view will be used as the email body when we send using the Mailable class.
Define a Notification
For the Notification approach we can do something similar using Notification classes
php artisan make:notification NewsletterNotification
The class looks like so:
namespace App\Notifications;

use Illuminate\Bus\Queueable;
use Illuminate\Notifications\Messages\MailMessage;
use Illuminate\Notifications\Notification;

class NewsletterNotification extends Notification
{
    use Queueable;

    public function __construct()
    {
    }

    public function via(object $notifiable): array
    {
        // use mail to send
        return ['mail'];
    }

    public function toMail(object $notifiable): MailMessage
    {
        return (new MailMessage)
            ->line('Welcome to our notifications!')
            ->line('We are glad you have decided to use notifications.');
    }
}
Notice here we don't use a view. This is because laravel will style our notifications for us. This is a major difference between Mailables and Notifications.
Create controller routes
We want users to sign up with email addresses for a fake newsletter. Let's use artisan to create controllers and routes for each method:
php artisan make:controller NewsLetter
php artisan make:controller Notification
We will show a form on each page so let's wire up the routes:
Route::get('/newsletter', [NewsletterController::class, 'create']);
Route::post('/newsletter', [NewsletterController::class, 'store']);
Route::get('/notification', [NotificationController::class, 'create']);
Route::post('/notification', [NotificationController::class, 'store']);
Define controllers
So we have defined our routes and mail config. Now let's create a controller for each method.
Mailable controller
For the mailable use we need a form with an email input like this:
Let's define the view:
@extends('layout', ['logo' => '/newsletter.svg'])
@section('content')
<div class="scale-100 p-6 bg-white dark:bg-gray-800/50 dark:bg-gradient-to-bl from-gray-700/50 via-transparent
dark:ring-1 dark:ring-inset dark:ring-white/5 rounded-lg shadow-2xl shadow-gray-500/20 dark:shadow-none flex transition-all duration-250 focus:outline focus:outline-2 focus:outline-red-500">
    <div>
        <h2 class="text-xl font-semibold text-gray-900 dark:text-white">Enter your newsletter details</h2>

        <p class="mt-4 text-gray-500 dark:text-gray-400 text-sm leading-relaxed">
            We will email you every Sunday with the latest Laravel news.
        </p>
        <div class="mt-4">
            <form class="flex flex-col gap-4" method="POST" action="/newsletter" data-test-id="newsletter-form">
                @csrf
                <label>
                    <input type="email" id="email" name="email" required placeholder="Your email address..." class="appearance-none rounded p-2 w-full">
                </label>
                <button type="submit" id="submit" class="rounded bg-red-500 text-white p-2 px-4">Sign up</button>
            </form>
        </div>
    </div>
</div>
@endsection
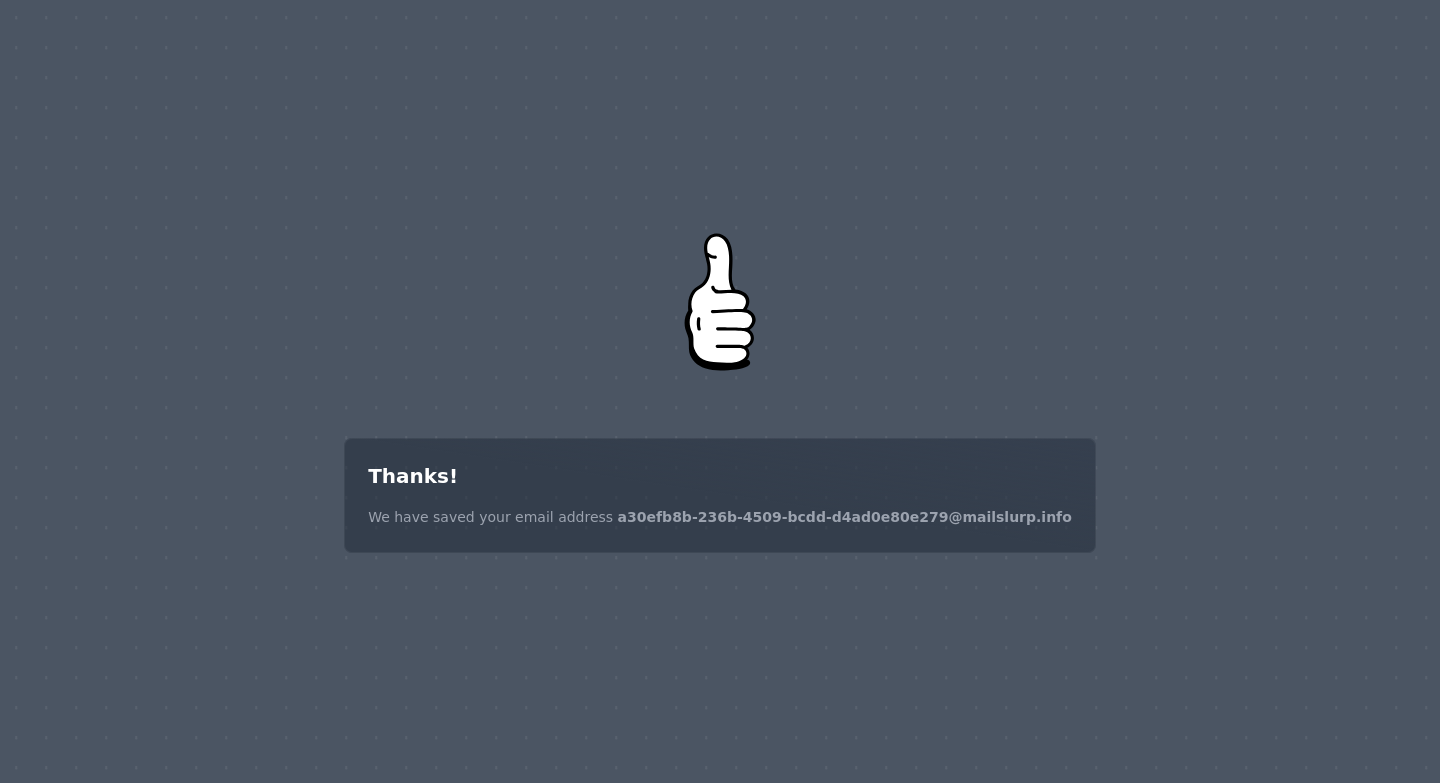
The important part here is the form and input. We also need a view for when the form is successfully submitted:
@extends('layout', ['logo' => '/success.svg'])
@section('content')
<div class="scale-100 p-6 bg-white dark:bg-gray-800/50 dark:bg-gradient-to-bl from-gray-700/50 via-transparent
dark:ring-1 dark:ring-inset dark:ring-white/5 rounded-lg shadow-2xl shadow-gray-500/20 dark:shadow-none flex transition-all duration-250 focus:outline focus:outline-2 focus:outline-red-500">
    <div>
        <h2 class="text-xl font-semibold text-gray-900 dark:text-white">Thanks!</h2>

        <p class="mt-4 text-gray-500 dark:text-gray-400 text-sm leading-relaxed" data-test-id="newsletter-success">
            We have saved your email address <span class="font-semibold" data-test-id="email-result">{{$email}}</span>
        </p>
    </div>
</div>
@endsection
This will thank the user after submission. Next we need to wire up the views with our controller and configure the Mailable call:
namespace App\Http\Controllers;

use App\Mail\Newsletter;
use Illuminate\Http\Request;
use Illuminate\Support\Facades\Mail;

class NewsletterController extends Controller
{
    public function create()
    {
        return view('newsletter');
    }

    public function store(Request $request)
    {
        // get the email from the form submission
        $email = $request->validate(['email' => 'required|email']);

        // send an email to the user using the Newsletter Mailable
        Mail::to($email['email'])->send(new Newsletter($email['email']));

        return view('newsletter-success', ['email' => $email['email']]);
    }
}
This configuration allows the user to submit the newsletter form and be emailed using a Mailable. After that we render the success form.
Notification controller
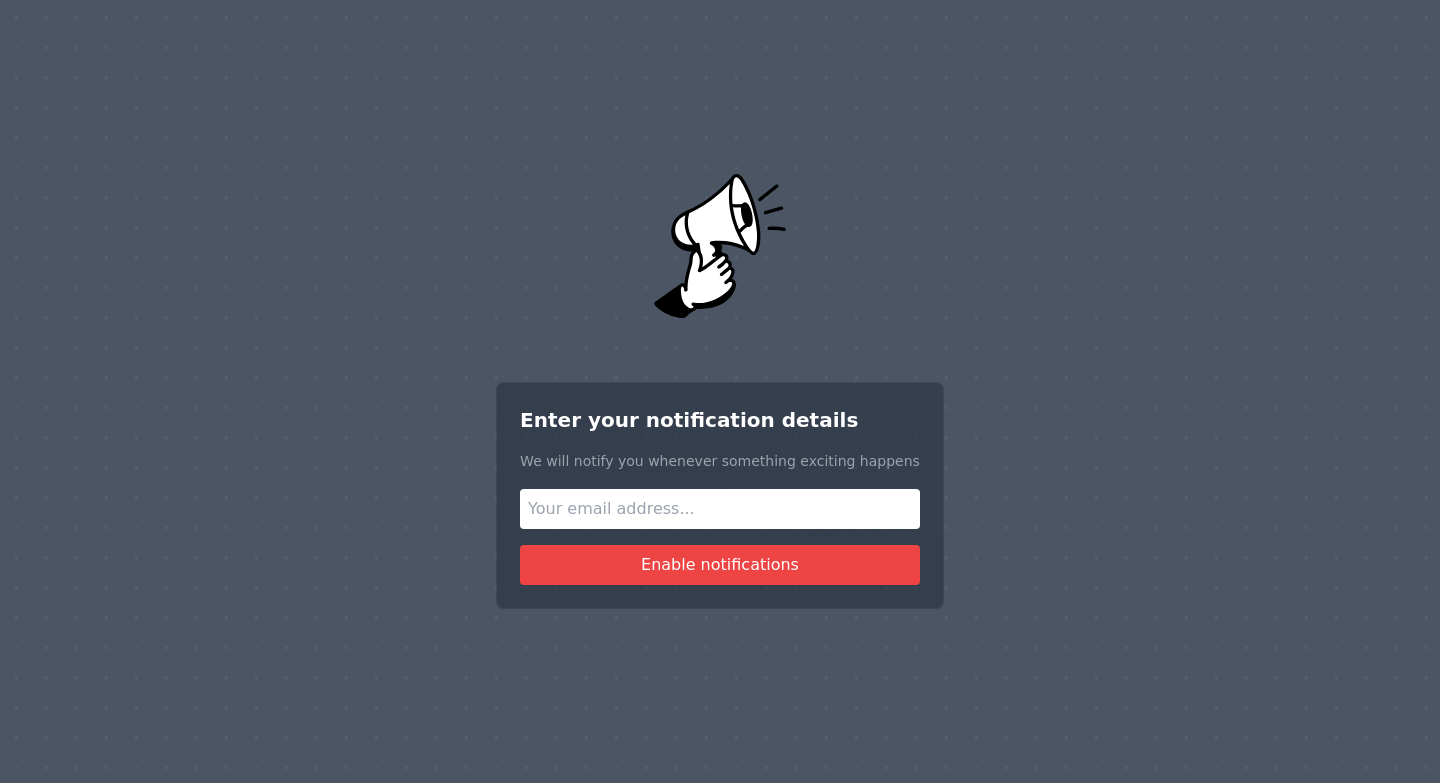
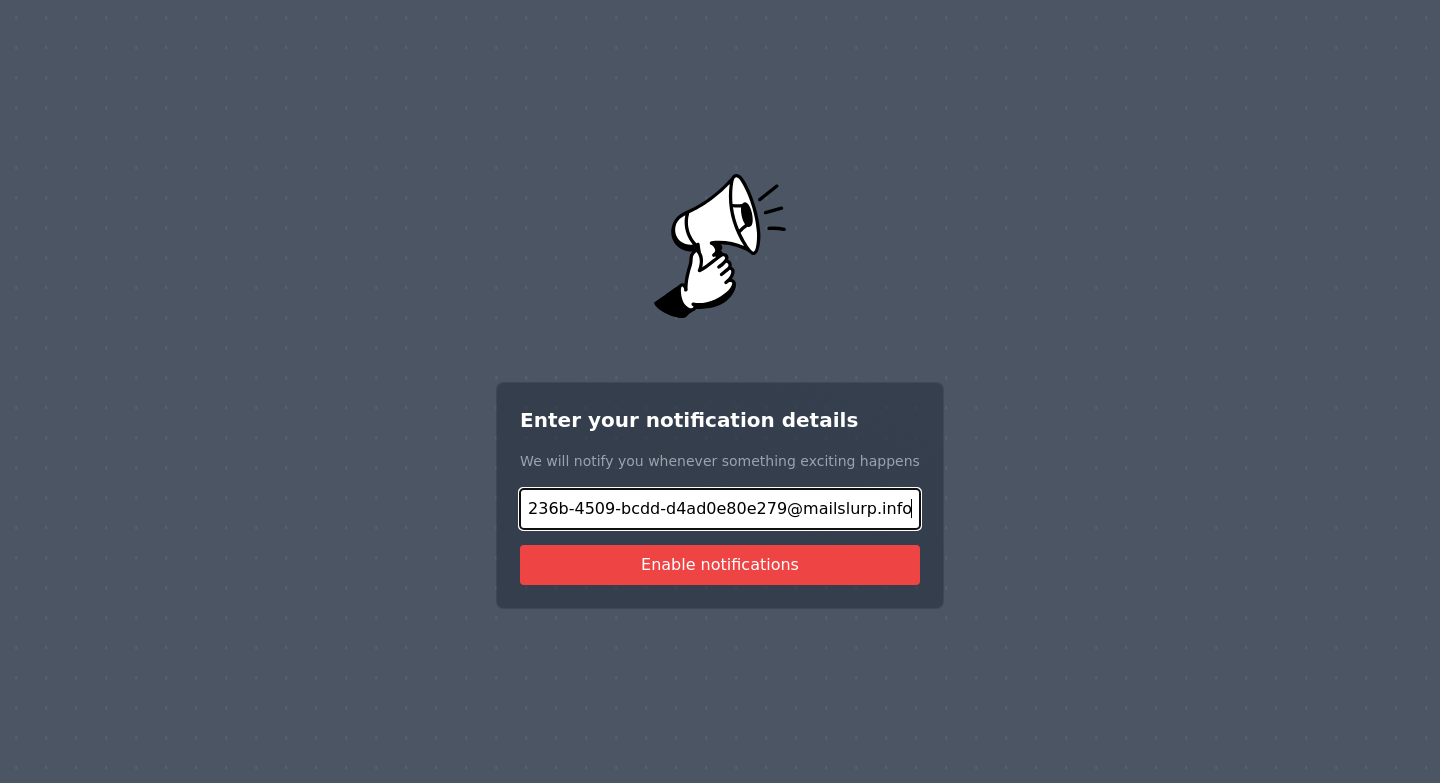
We can also do the same using Notifications. Here we need a similar form with views and controller:
@extends('layout', ['logo' => '/notification.svg'])
@section('content')
<div class="scale-100 p-6 bg-white dark:bg-gray-800/50 dark:bg-gradient-to-bl from-gray-700/50 via-transparent
dark:ring-1 dark:ring-inset dark:ring-white/5 rounded-lg shadow-2xl shadow-gray-500/20 dark:shadow-none flex transition-all duration-250 focus:outline focus:outline-2 focus:outline-red-500">
    <div>
        <h2 class="text-xl font-semibold text-gray-900 dark:text-white">Enter your notification details</h2>

        <p class="mt-4 text-gray-500 dark:text-gray-400 text-sm leading-relaxed">
            We will notify you whenever something exciting happens
        </p>
        <div class="mt-4">
            <form class="flex flex-col gap-4" method="POST" action="/notification" data-test-id="notification-form">
                @csrf
                <label>
                    <input type="email" id="email" name="email" required placeholder="Your email address..." class="appearance-none rounded p-2 w-full">
                </label>
                <button type="submit" id="submit" class="rounded bg-red-500 text-white p-2 px-4">Enable notifications</button>
            </form>
        </div>
    </div>
</div>
@endsection
The success page will look like this:
@extends('layout', ['logo' => '/success.svg'])
@section('content')
<div class="scale-100 p-6 bg-white dark:bg-gray-800/50 dark:bg-gradient-to-bl from-gray-700/50 via-transparent
dark:ring-1 dark:ring-inset dark:ring-white/5 rounded-lg shadow-2xl shadow-gray-500/20 dark:shadow-none flex transition-all duration-250 focus:outline focus:outline-2 focus:outline-red-500">
    <div>
        <h2 class="text-xl font-semibold text-gray-900 dark:text-white">Thanks!</h2>

        <p class="mt-4 text-gray-500 dark:text-gray-400 text-sm leading-relaxed" data-test-id="notification-success">
            We have saved your email address <span class="font-semibold" data-test-id="email-result">{{$email}}</span>
        </p>
    </div>
</div>
@endsection
Next we configure the views inside the Notification controller and use the NewsletterNotification class to email the user:
namespace App\Http\Controllers;

use App\Notifications\NewsletterNotification;
use Illuminate\Http\Request;
use Illuminate\Support\Facades\Notification;

class NotificationController extends Controller
{
    public function create()
    {
        return view('notification');
    }

    public function store(Request $request)
    {

        // get the email from the form submission
        $email = $request->validate(['email' => 'required|email']);

        // send an email to the user using the Newsletter Notification
        Notification::route('mail', $email['email'])
            ->notify(new NewsletterNotification());

        return view('notification-success', ['email' => $email['email']]);
    }
}
This configures views for submission and success:
Testing the application with Dusk
So now we have created routes, views, and controllers for Mailable and Notification methods. Next we want to define two browser tests that will:
- Load the welcome page in a browser
- Click on each link
- Create a disposable email address
- Submit the email address for newsletter sign-up
- Verify that the email is sent and received
What is Dusk?
The most common way to test Laravel applications end-to-end with real browsers is Dusk. Dusk uses Chromedriver to instantiate a headless chrome browser and control it remotely. You can define tests in PHP and assert that our application is functioning correctly.
How does MailSlurp integrate?
The reason for using MailSlurp is that it lets us create throwaway email accounts during tests and use them to sign up and receive emails. We can also use the MailSlurp PHP client to wait for the sent emails and fetch them for verification.
Create Dusk tests
public function testNewsletterMailable(): void
{

    $this->browse(function (Browser $browser) {
        $MAILSLURP_API_KEY = env('API_KEY');
        // configure mailslurp client
        $config = MailSlurp\Configuration::getDefaultConfiguration()->setApiKey('x-api-key', $MAILSLURP_API_KEY);
        $inboxController = new MailSlurp\Apis\InboxControllerApi(null, $config);

        // create a disposable email address
        $inbox = $inboxController->createInboxWithDefaults();

        // load the app in the browser
        $browser->resize(1440, 900);
        $browser->visit('http://localhost:8000/')
            ->assertSee('Sign up for our newsletter');
        $browser->screenshot('welcome');

        // click the newsletter link
        $browser->click('[data-test-id="newsletter-link"]');
        $browser->waitFor('[data-test-id="newsletter-form"]');
        $browser->screenshot('newsletter-form');

        // fill the newsletter sign up form with the disposable email address
        $browser->type('#email', $inbox->getEmailAddress());
        $browser->screenshot('newsletter-form-filled');
        $browser->click('#submit');

        // submit the form and see a success message
        $browser->waitFor('[data-test-id="newsletter-success"]');
        $browser->screenshot('newsletter-success');

        // now use MailSlurp to await the email sent by our NewsletterController
        $waitForController = new MailSlurp\Apis\WaitForControllerApi(null, $config);
        $email = $waitForController->waitForLatestEmail($inbox->getId(), 60_000, true);
        assert($email->getSubject() === 'Welcome to our newsletter');

        // get email content
        $browser->resize(800, 400);
        $emailController = new MailSlurp\Apis\EmailControllerApi(null, $config);
        $previewUrls = $emailController->getEmailPreviewURLs($email->getId());
        $browser->visit($previewUrls->getPlainHtmlBodyUrl());
        $browser->screenshot('newsletter-mailable-preview');
    });
}
Run integration tests
To run the tests we first need to run the Laravel application php artisan serve in a separate terminal. Then execute API_KEY=$(API_KEY) php artisan dusk.
The test will load the application, create an email address, fill out the form, then wait for the email to arrive:
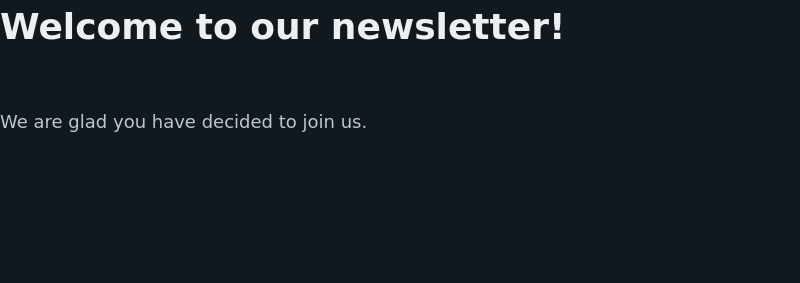
We then use the getEmailPreviewURLs method to fetch the render email and view it in our browser:
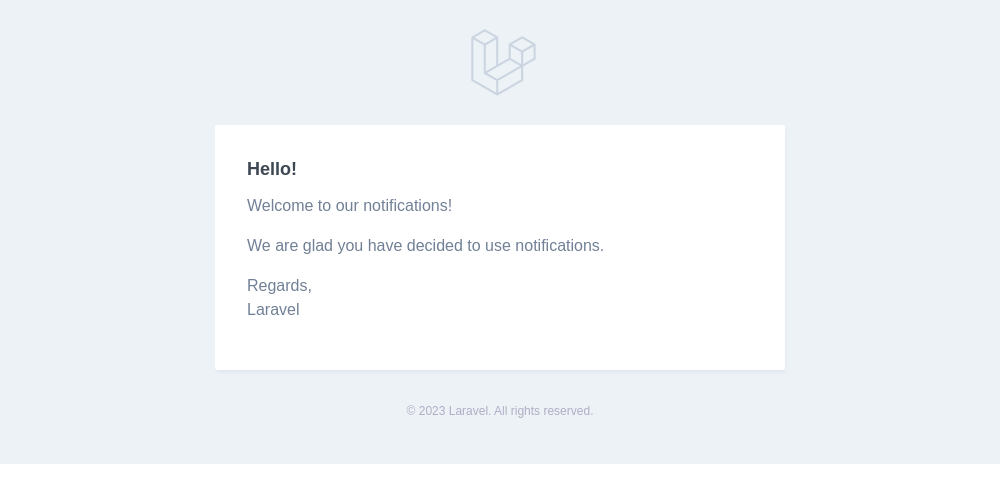
Notice how the notification is rendered using a Laravel built-in template. The Mailable on the other hand uses only our own blade view:
Conclusion
Woah! That was a lot of code but we also achieved something remarkable: we sent emails using both Mailable and Notification classes plus we tested it using Dusk integration tests and MailSlurp disposable email addresses. You can do the same and test your application end to end with real email (and SMS).
Next steps for Laravel production teams
After your first Dusk test is stable, extend your coverage with:
- Email Sandbox API for deterministic inbox creation and assertions per test run.
- Email testing tools for CI-friendly workflow design patterns.
- Email deliverability test for sender and inbox-placement checks before rollout.
- Email automation routing for handling inbound reply workflows in operations.