guides
Send and receive emails and attachments using MailSlurp
Use inbound and outbound email in code, mail-clients, or online dashboard. Add attachments, configure webhooks and gain SMTP access.
MailSlurp is a powerful email service for developers, QA testers, and email marketers. Create real email addresses on demand and then send and receive emails at scale in any platform or context you choose. Emails can be sent and received in numerous ways with MailSlurp. This post will cover some common uses.
Setup a mailbox
The key component of MailSlurp is the Inbox - a real email address that can be created and configured programmatically. The inbox type determines which sending and receiving methods are available. For SMTP and IMAP access ensure you use the SMTP inbox type. The same applies to domains if you are using a custom domain.
Create an inbox online
Login to the MailSlurp dashboard to create an inbox using the graphical interface.

Create an inbox in code
Use the REST API or developer SDK clients to create mailboxes in code and tests. Here is an example using the MailSlurp Javascript client:
const inbox = await mailslurp.createInbox();
expect(inbox.emailAddress).toContain("@");
See the other SDK clients for examples in your preferred programming language.
Sending emails
You can send emails from any inbox you create in a variety of ways including the REST API, graphQL, SMTP and using the online mail client.
Send with email API
await mailslurp.sendEmail(inbox.id, {
  to: [recipientEmail],
  // can include names in addresses in the format below
  replyTo: '"Support" <support@my-app.com>',
  // quote the property if a reserved word
  ["from"]: inbox.emailAddress,
});
See the API documentation for more information.
Filtering bounced recipients
Sending emails to recipients that have bounced in the past will throw an API error. To avoid this use the filterBouncedRecipients flag to filter out any known bad addresses when sending. If the email addresses are not already known then it is best to use the validation options below.
// use the `filterBouncedRecipients` to filter
// out previously bounced recipients and avoid errors
await mailslurp.sendEmail(inboxId, {
  to: [recipient, bouncedRecipient],
  filterBouncedRecipients: true,
});
// will only email `recipient` and will skip a known bounced recipient
Verify or validate email addresses
You can verify email address lists before sending or when you send using a validation filter. Here is how verify emails before sending:
const verificationResult = await mailslurp.emailVerificationController.validateEmailAddressList(
  {
    validateEmailAddressListOptions: {
      emailAddressList: [recipient],
    },
  },
);
// returns a map of `{ emailAddress: isValid }`
expect(verificationResult.resultMapEmailAddressIsValid[recipient]).toBeTruthy();
// or lookup results in arrays
expect(verificationResult.invalidEmailAddresses.length).toEqual(0);
expect(verificationResult.validEmailAddresses.length).toEqual(1);
To verify during sending you can pass a validation option that will either remove bad addresses after verification or throw an error:
// the `validateEmailAddresses` option will verify then filter and remove bad recipients
// you can also configure the method to throw instead with `VALIDATE_ERROR_IF_INVALID`
await mailslurp.sendEmail(inboxId, {
  to: [recipient, bouncedRecipient],
  validateEmailAddresses:
    SendEmailOptionsValidateEmailAddressesEnum.VALIDATE_FILTER_REMOVE_INVALID,
});
Send with queue system
Send emails using a pub/sub queue system to ensure delivery and enable recovery from failure. Use the sending options in the dashboard or in code:
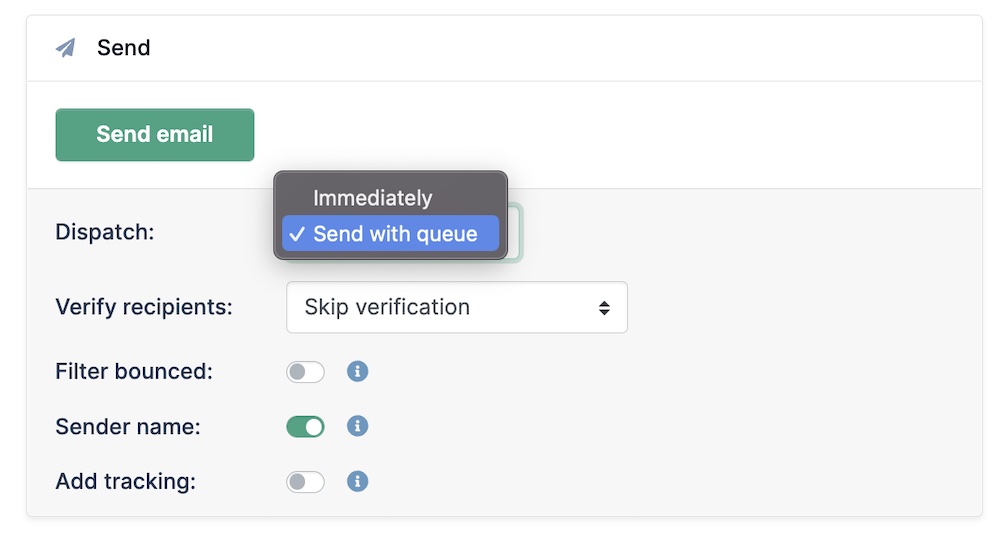
To send with a queue in code use the following methods:
await mailslurp.inboxController.sendEmailWithQueue({
  inboxId: inboxId,
  sendEmailOptions: {
    to: [recipient],
    subject: "Sent with a queue",
    body:
      "Use queues to allow recovery of failed email " +
      "sending when account reaches limits or has payment issues",
  },
  // validate before adding to queue to fail early
  validateBeforeEnqueue: false,
});
Emails send via a queue will be retried until delivery succeeds.
Schedule sending at later time
Use the job scheduler in MailSlurp to send emails at a given time or delay email sending.
await mailslurp.inboxController.sendWithSchedule({
  inboxId: inbox.id,
  sendAtNowPlusSeconds: 5,
  validateBeforeEnqueue: true,
  sendEmailOptions: {
    to: [inbox.emailAddress],
    subject: "test-schedule-123",
    body: "🌭",
  },
});
One can also pass a timestamp to send at a given time:
try {
  await mailslurp.inboxController.sendWithSchedule({
    // schedule sending 5 second from now
    sendAtTimestamp: new Date(new Date().getTime() + 5000),
    inboxId: inbox.id,
    validateBeforeEnqueue: true,
    sendEmailOptions: {
      to: [inbox.emailAddress],
      subject: "test-schedule-at",
      body: "⏰",
    },
  });
} catch (e) {
  const errorMessage = await e.json();
  throw errorMessage;
}
// now wait for the email to arrive
const expected = await mailslurp.waitController.waitForMatchingFirstEmail({
  inboxId: inbox.id,
  matchOptions: {
    matches: [
      {
        field: MatchOptionFieldEnum.SUBJECT,
        should: MatchOptionShouldEnum.CONTAIN,
        value: "test-schedule-at",
      },
    ],
  },
  timeout: 60_000,
  unreadOnly: true,
});
expect(expected.body).toContain("⏰");
See the schedule email guide.
Send with SMTP
Every SMTP inbox you create in MailSlurp can be controlled via SMTP. View the access details on the dashboard homepage:
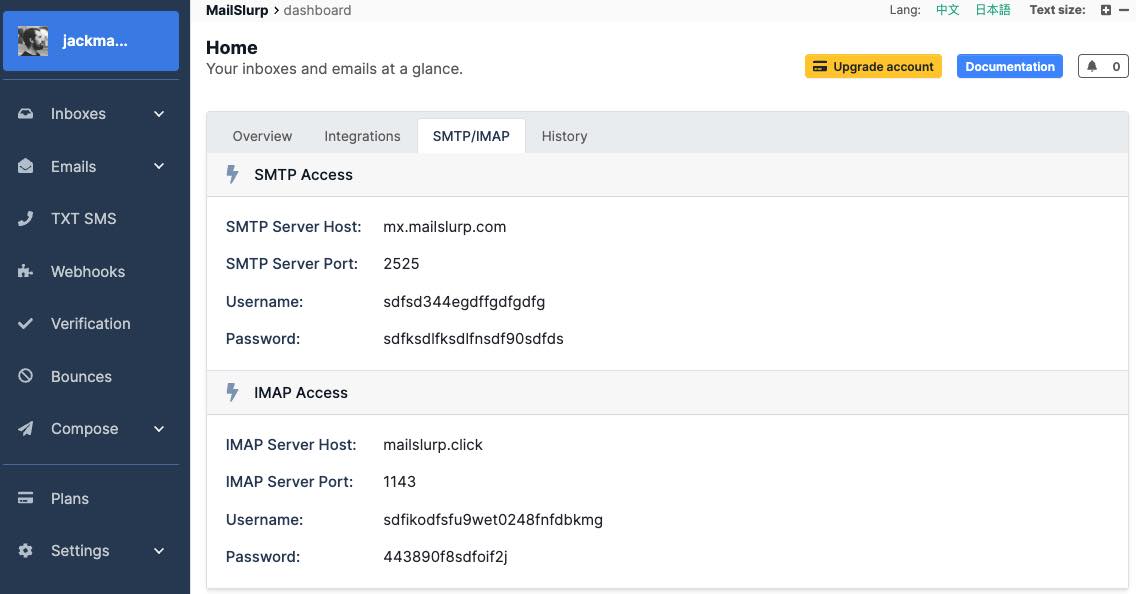
Configure any SMTP client to use an inbox SMTP settings. Access the SMTP port, host, username and password using the getImapSmtpAccess method:
// create an inbox using MailSlurp client
const mailslurp = new MailSlurp({ apiKey: process.env.API_KEY! });
const inbox = await mailslurp.createInboxWithOptions({
  inboxType: CreateInboxDtoInboxTypeEnum.SMTP_INBOX,
});
// get smtp access details for mailbox
const server = await mailslurp.inboxController.getImapSmtpAccess({
  inboxId: inbox.id,
});
// Create auth plain transport
const transport = nodemailer.createTransport({
  host: server.smtpServerHost,
  port: server.smtpServerPort,
  secure: false,
  auth: {
    user: server.smtpUsername,
    pass: server.smtpPassword,
    type: "PLAIN",
  },
});
// Send email
const sent = await transport.sendMail({
  from: inbox.emailAddress,
  to: inbox.emailAddress,
  subject: "Test outbound email",
  text: "Can I send on behalf?",
  html: "<b>Hello world</b>",
});
Read the SMTP tutorial for details.
Send with IMAP
Read the IMAP tutorial for details.
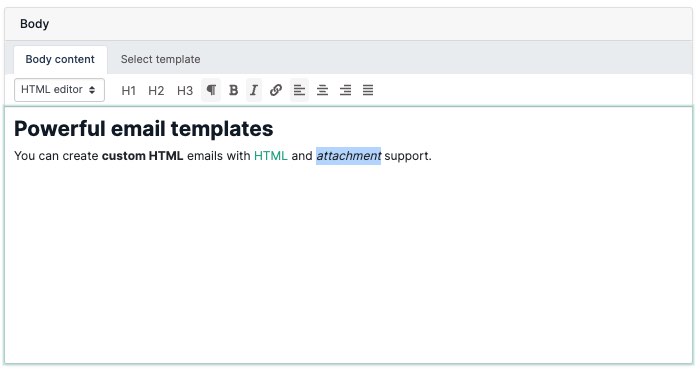
Send online in dashboard
Upload attachments and compose emails in the MailSlurp dashboard.
Receiving emails
MailSlurp runs SMTP mail servers that receive emails for your inbox email addresses. Emails are parsed and stored and made available via HTTP API, SMTP/IMAP, and online.
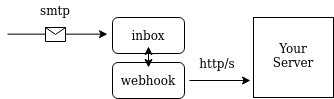
Receive via HTTP/S Webhooks
Have inbound emails sent to your server via secure HTTP/S webhooks backed by queues. Handle large inbound flow, respond to email events and recover from failures. Webhooks are the best way to process emails in production.
See webhook documentation to start using webhooks.
Receive with API waitFor/match methods
Email is an asynchronous system as emails that are sent need to time to arrive. MailSlurp provides methods to wait for emails to arrive and conditions to be met. This way your tests can wait until an expected email is received and assert against it.
// return at least one unread email or wait 30 seconds for one to arrive
const [email] = await mailslurp.waitController.waitFor({
  waitForConditions: {
    inboxId: inbox.id!,
    count: 1,
    timeout: 30000,
    unreadOnly: true,
  },
});
See the wait for guide and email matching documentation.
Receive email in SMTP/IMAP
Connect your SMTP client or IMAP mail software to MailSlurp using the SMTP/IMAP credentials assigned to each inbox. See the IMAP/SMTP documentation for more information.
Read email online in dashboard
View your inboxes in the web app interface. Click the emails tab in the sidebar or view emails within an inbox:
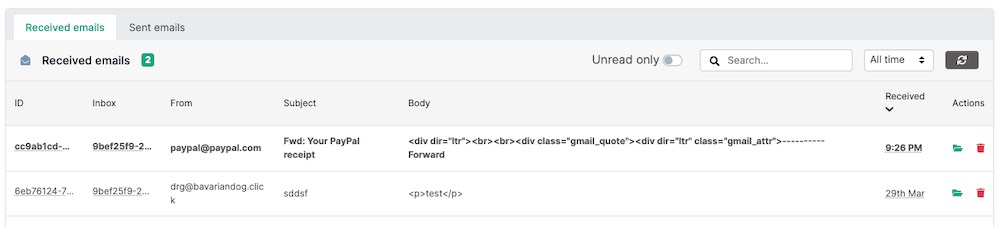
Clicking on an email will open the full message and show the email.
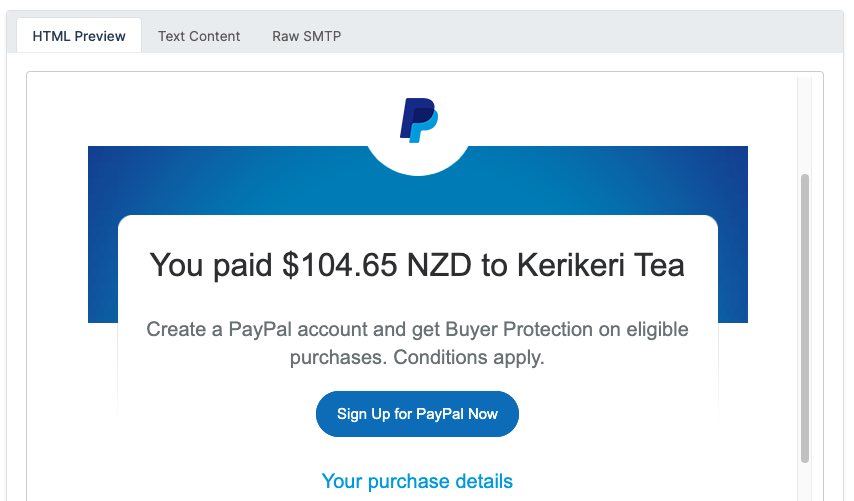
You can also view the raw SMTP message, spam analysis, recipients, headers and more on the email page.
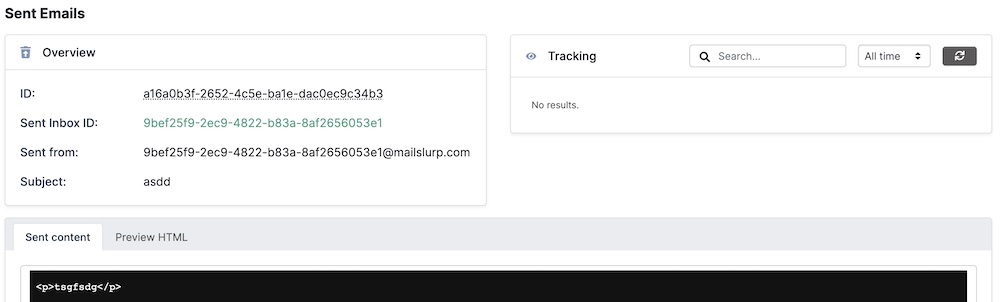
Sent emails and delivery status
Each email you send creates a sent email entity and a delivery status record. Here is a preview in the dashboard of the sent email page.

Sent emails
Sent emails can be viewed in the dashboard or downloaded using the API.
Delivery statuses
When an email sending attempt is made the transaction result is saved as a delivery status that contains the SMTP mail server IP address and response status for debugging.
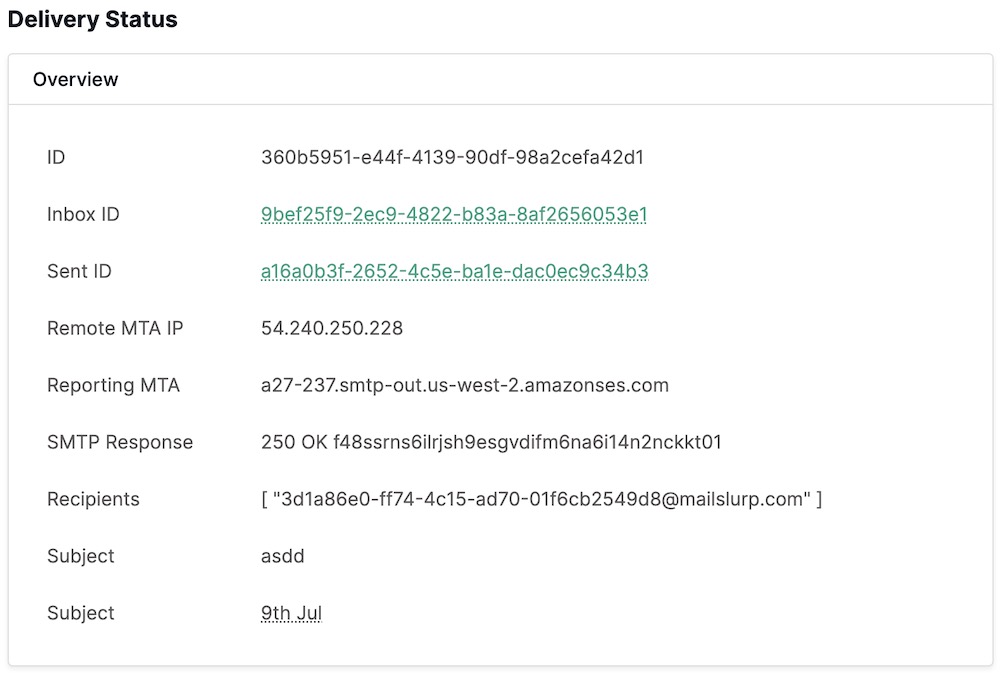
You can see all the sent statuses in the dashboard or using the API endpoints.

Email open tracking
MailSlurp can report delivery status and email open events using embedded pixels sent with emails that log opening.
Create tracking pixel
Send with tracking
View email open results
Contact lists
Creating contacts
Creating group lists
Send emails from lists and groups
Templates
Email templates allow transactional email marketing campaigns with variable replacement. Create templates with moustache {{var}} variables and then set the field values when sending to replace the variables in the email.
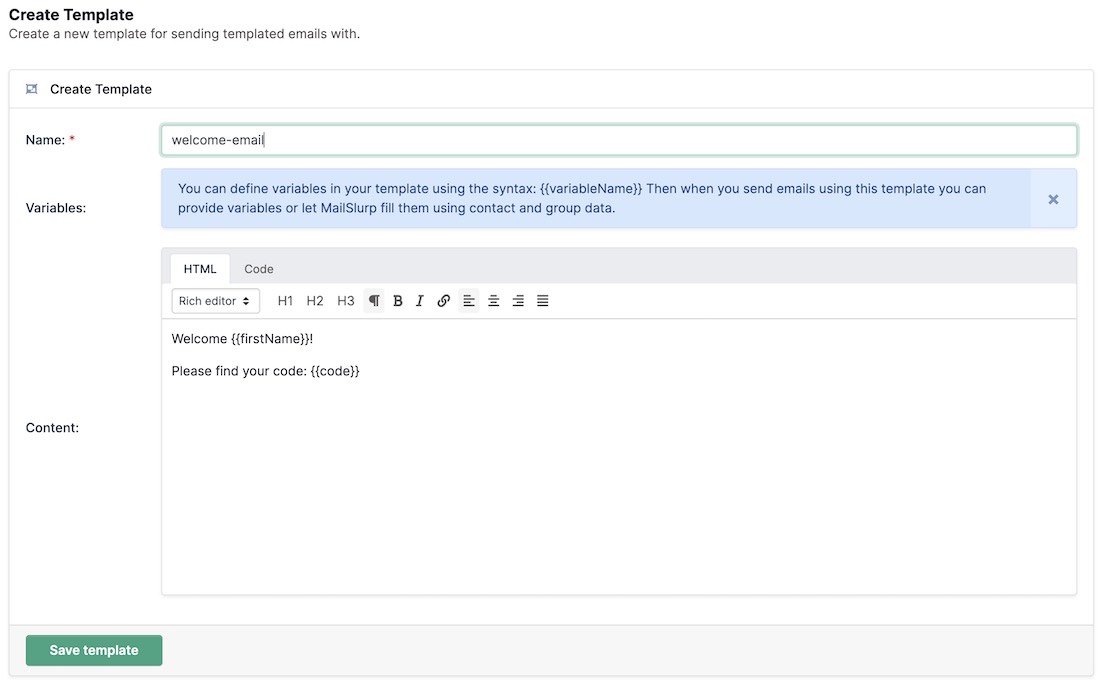
Create templates
Create an email template in the dashboard or using the API. You can include variables using moustache style templating.
await mailslurp.templateController.createTemplate({
  createTemplateOptions: {
    name: "Welcome",
    content: "Welcome to our app",
  },
});
Or in the dashboard:
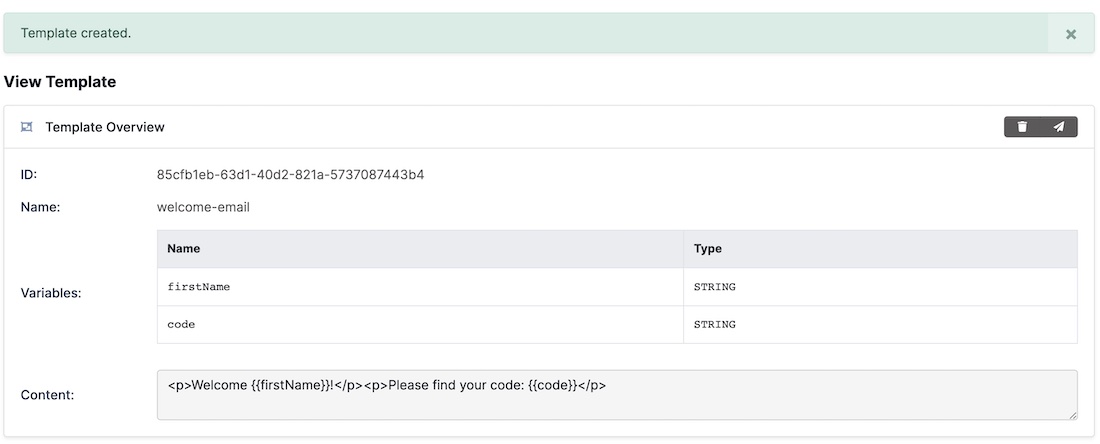
After creating a template you will see the detecting variables and types:
Variable syntax
If you want to use variables in your templates simple wrap each variable in double curly braces:
const template = await mailslurp.templateController.createTemplate({
  createTemplateOptions: {
    name: "Welcome email",
    content: "Hello {{firstName}}. Welcome to {{brandName}}.",
  },
});
expect(template.id).toBeTruthy();
expect(template.variables).toEqual([
  {
    name: "firstName",
    variableType: TemplateVariableVariableTypeEnum.STRING,
  },
  {
    name: "brandName",
    variableType: TemplateVariableVariableTypeEnum.STRING,
  },
]);
Send templated emails
Send templated emails by passing the templateId and templateVariables in the send email options API calls:
const templateObject = await mailslurp.templateController.getTemplate({
  templateId,
});
expect(templateObject.content).toContain("Hello {{firstName}}. Welcome to {{brandName}}.");
const sent = await mailslurp.sendEmail(inboxId, {
  to: [emailAddress],
  subject: "Welcome {{firstName}}",
  template: templateId,
  templateVariables: {
    firstName: "Sally",
    brandName: "My Company",
  } as any,
});
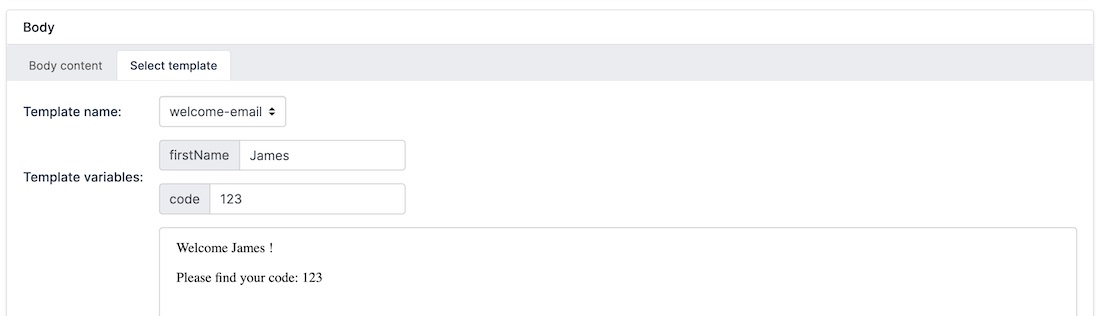
Or in the dashboard when composing:

Variables can be provided directly or implicitly from contact group firstName and lastName properties.
Verification and bounces
Emails that are sent to non-existing inboxes can result in email bounce backs. Bounces and complaints negatively affect your sending reputation and can result in account freeze, so it is important to monitor your bounces and respond to them.
The best way to avoid bounces is to verify email addresses and filter out bounced recipients when sending.
Validate email addresses when sending
To validate as you send and remove bad email recipients use the validate options.
// the `validateEmailAddresses` option will verify then filter and remove bad recipients
// you can also configure the method to throw instead with `VALIDATE_ERROR_IF_INVALID`
await mailslurp.sendEmail(inboxId, {
  to: [recipient, bouncedRecipient],
  validateEmailAddresses:
    SendEmailOptionsValidateEmailAddressesEnum.VALIDATE_FILTER_REMOVE_INVALID,
});
Validate list of recipients
You can also validate ahead of time with email lists with the email validation controller:
const verificationResult = await mailslurp.emailVerificationController.validateEmailAddressList(
  {
    validateEmailAddressListOptions: {
      emailAddressList: [recipient],
    },
  },
);
// returns a map of `{ emailAddress: isValid }`
expect(verificationResult.resultMapEmailAddressIsValid[recipient]).toBeTruthy();
// or lookup results in arrays
expect(verificationResult.invalidEmailAddresses.length).toEqual(0);
expect(verificationResult.validEmailAddresses.length).toEqual(1);
Filter known bounced recipients
Use the bounce recipient filter to remove any known recipients at sending time:
// use the `filterBouncedRecipients` to filter
// out previously bounced recipients and avoid errors
await mailslurp.sendEmail(inboxId, {
  to: [recipient, bouncedRecipient],
  filterBouncedRecipients: true,
});
// will only email `recipient` and will skip a known bounced recipient
Managing bounce-backs
Attachments
Attachments in MailSlurp are stored separately from emails and can be uploaded and downloaded using an attachment ID. Attachments can be passed as octet streams or base64 encoded strings. Most examples use base64 for easier development.
Uploading attachments
To upload attachments use the upload attachment method and pass a base64 encoded string for the file content. An array containing an attachment ID will be returned. Use the attachment ID to send the attachment or download it.
// notice that an array with one attachment id is returned
const [attachmentId] = await mailslurp.uploadAttachment({
  base64Contents: Buffer.from("hello").toString("base64"),
  contentType: "text/plain",
  filename: "test.txt",
});
See the attachment guide for more information.
Sending attachments
Attachments can be sent my passing the attachment ID to the send email options:
await mailslurp.sendEmail(inbox.id!, {
  to: [inbox.emailAddress!],
  subject: "attachment test",
  attachments: [attachmentId.toString()],
});
Downloading attachments
Download attachment as base64 like so:
const attachment = await mailslurp.attachmentController.downloadAttachmentAsBase64Encoded({
  attachmentId: email.attachments?.[0]!,
});
const content = new Buffer(attachment.base64FileContents!, "base64").toString("utf8");
expect(content).toEqual("hello");
There are other download methods and encodings available on the Attachment controller.
Spam analysis and content validation
Reply and forward
Inbox configuration
See the inbox configuration guide or developer documentation