
guides
How to Test HubSpot Inbox Placement and Spam Score
Run a HubSpot inbox placement test across Gmail, Google Workspace, Outlook, and Microsoft 365, then review provider placement, campaign content, and sending-domain signals.
Use with your tools
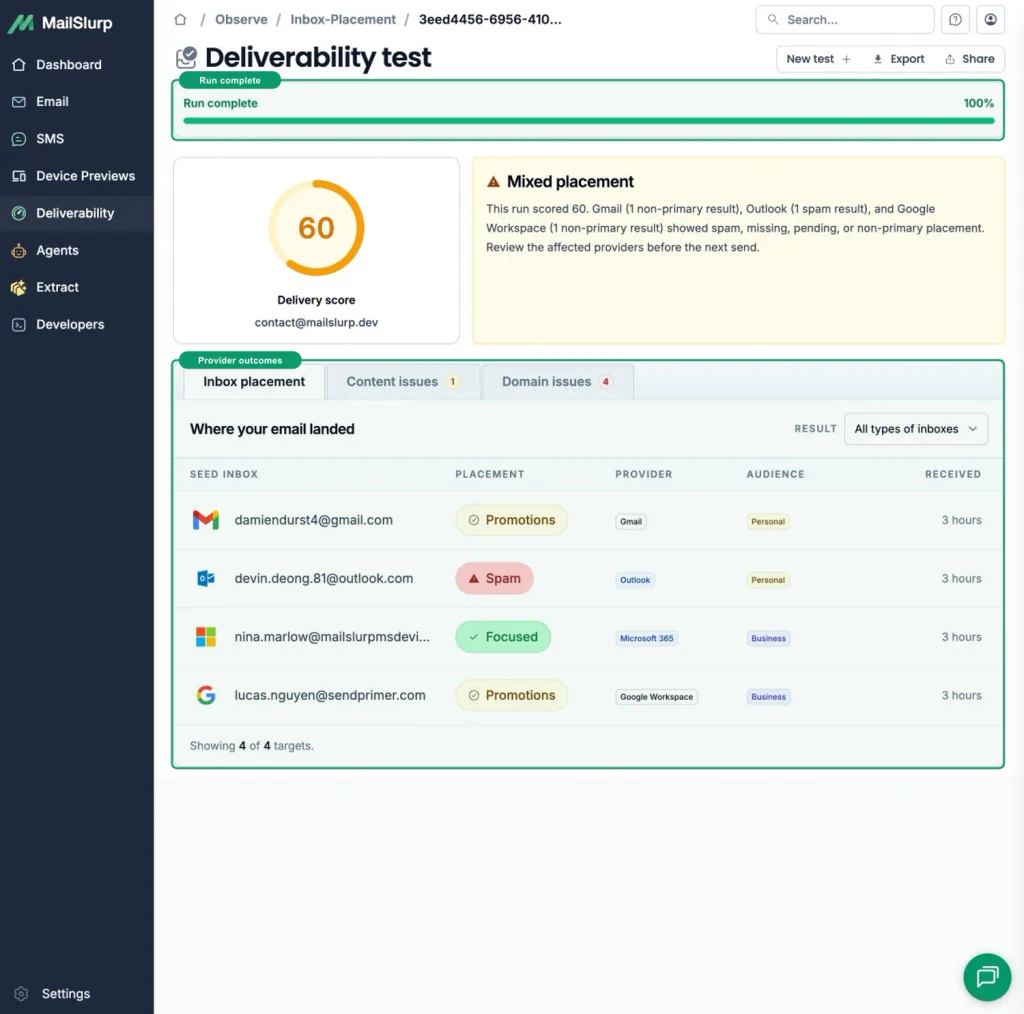
A successful HubSpot send tells you that HubSpot accepted the campaign. It does not tell you whether Gmail put it in Promotions, Outlook put it in Spam, or Microsoft 365 kept it in Focused. Send the final marked campaign from HubSpot to MailSlurp's current test addresses to see those provider outcomes separately.
Quick answer
- Create a new MailSlurp inbox placement test.
- Copy its unique marker and current seed addresses.
- Choose Download CSV for your mail provider, select HubSpot, and download the provider-ready file.
- Import the CSV into a dedicated HubSpot contact selection.
- Add the exact marker to the campaign subject or body.
- Turn off Don't send to unengaged contacts for the isolated seed audience, then send the final campaign only to that selection.
- Return to MailSlurp, get the score, and wait for the run to complete.
- Review the percentage, provider rows, content issues, and domain issues.
Create a fresh run for every campaign revision. The marker and seed list identify one specific test.
What one real HubSpot placement run found
The completed HubSpot campaign used for this guide reached all four controlled provider seeds, but it did not receive the same placement everywhere.
| Controlled seed | Observed placement |
|---|---|
| Gmail personal | Promotions |
| Outlook personal | Spam |
| Microsoft 365 business | Focused |
| Google Workspace business | Promotions |
The run completed with a delivery score of 60. It also reported one content issue and four domain issues, although this overview screenshot does not show their individual details. The important result was the split: the same HubSpot campaign was delivered to categorized or focused inboxes at three seeds while the Outlook personal seed placed it in Spam.
That does not prove Outlook always treats HubSpot mail more harshly, and it does not identify one universal cause. It gives the campaign owner a specific next investigation: open the Outlook result, review the recorded content and domain findings, confirm authentication and sender alignment, make a deliberate correction, and repeat the complete campaign with a fresh marker.
Before you begin
Use a connected HubSpot sending domain, a valid subscription type, and a marketing email that is ready to send. The controlled seed records must be marketing contacts before HubSpot will include them.
Use the sender, sending domain, subject, preview text, links, images, footer, subscription settings, and unsubscribe behavior planned for the campaign. Do not include customers or old seed addresses in the test audience.
Select only your test contacts
HubSpot can target individual contacts without requiring a permanent segment. Import the current seeds, make them marketing contacts, and select exactly those four records. A dedicated active segment is also suitable when the same controlled audience will be reused.
See the HubSpot marketing email documentation for the provider's current setup terminology and prerequisites.
Step 1: Create a fresh MailSlurp placement run
Open Inbox placement and create a test. Copy the unique marker and current provider seed addresses.
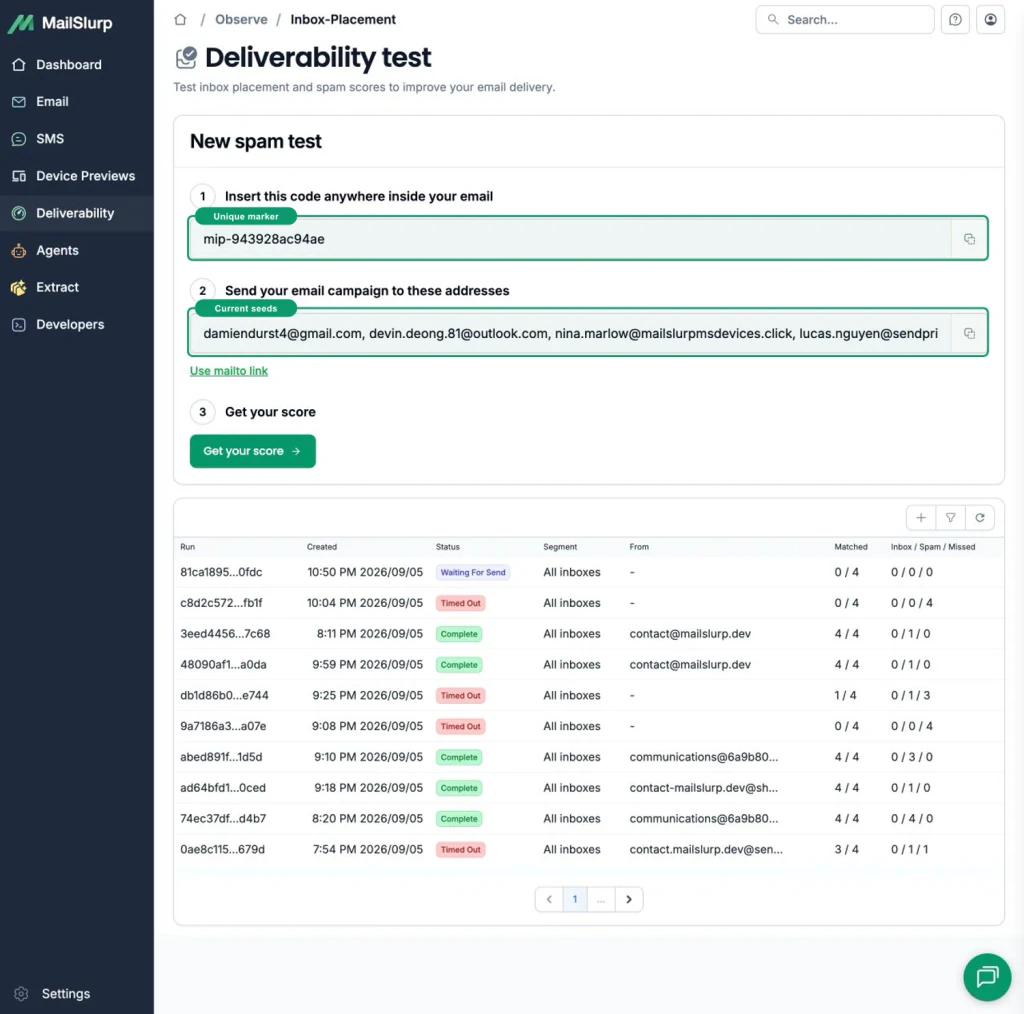
Never copy seed addresses or a marker from an older run or tutorial screenshot. The active values are what let MailSlurp associate the delivered messages with this result.
Step 2: Download the HubSpot CSV
Next to the mailto action, choose Download CSV for your mail provider. Select HubSpot, review the import instructions, and download the file. The exported rows use headers recognized by HubSpot and contain only the current MailSlurp seeds.
Step 3: Import the current seeds into HubSpot
- Open Contacts > Import and upload the HubSpot CSV from the current placement run.
- Map Email, First name, and Last name, then finish the import and set the four controlled records as marketing contacts.
- Select the four imported contacts in the email's Send to step, turn off Don't send to unengaged contacts for this isolated test, and confirm the estimated recipient count is four.
Keep this contact selection isolated. Remove expired seeds from earlier tests so the member count and active run remain unambiguous.
Step 4: Add the exact marker
Add the MailSlurp marker exactly as shown to the campaign subject or body. A clear subject pattern is:
HubSpot inbox placement test mip-example123
Keep the marker unchanged if HubSpot adds its own test prefix or tracking parameters.
Step 5: Send to the controlled seed audience
Review the regular marketing email, confirm the active marker and four controlled recipients, and make sure Don't send to unengaged contacts is off. New test contacts have no engagement history, so leaving this suppression on can reduce the send to zero even when the review panel initially shows four recipients. Send the campaign once.
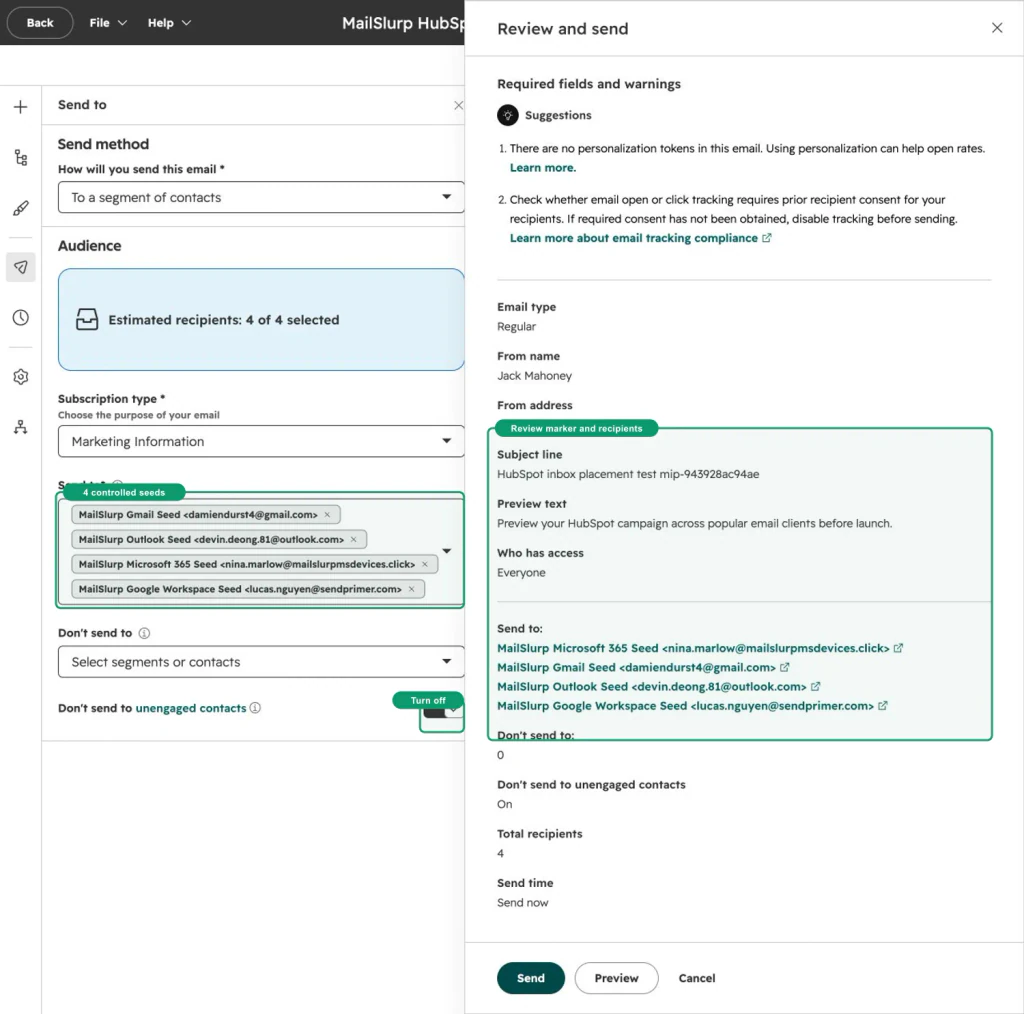
Confirm the send is accepted and that the recipient count matches the current MailSlurp seed list.
Step 6: Wait for the placement result
Return to the active MailSlurp run and get the score. Keep the result open until the observation window completes and the progress indicator reaches its final state.
Do not infer a missing provider result. Let the observation window resolve it as received or not received. A completed run can still contain mixed placement, as the real result above demonstrates.
Step 7: Interpret the result
| Result | Meaning |
|---|---|
| Primary or inbox | The provider placed the campaign in its main inbox experience. |
| Promotions | The message was delivered to a promotional category. |
| Focused or Other | The message was delivered to a named tab or filtered inbox experience. |
| Spam or junk | The provider classified the message as unwanted or suspicious. |
| Not received | MailSlurp did not observe the message at that seed during the test window. |
| Pending | The provider result is still being checked. |
A promotion or filtered-tab result is delivered, but it is different from primary placement. Evaluate the result against the campaign's purpose.
Step 8: Review content and domain issues
Open Content issues for message-level findings and Domain issues for sender and sending-domain checks. Treat those tabs as diagnostic evidence, not an automatic explanation for a provider decision. Use the findings to choose a specific correction:
- verify SPF, DKIM, and DMARC alignment for the sending domain
- confirm the visible From address and reply handling
- replace broken, redirected, or unnecessary links
- keep text, images, and alternative text balanced
- preserve a clear unsubscribe and preference path
- follow a HubSpot warmup plan for a new sending domain and avoid sudden volume changes or disengaged audiences
- retest the complete revised campaign with a fresh MailSlurp run
Use the email header analyzer on a received copy to inspect the provider's reported authentication results. For the observed run above, the Outlook Spam row is the failure to investigate first. The Gmail and Google Workspace Promotions rows are delivered category outcomes, while Microsoft 365 Focused is a separate business-inbox outcome. Do not flatten those four results into one pass/fail label.
HubSpot inbox placement checklist
- The marker and seeds came from the active MailSlurp run.
- The HubSpot CSV was downloaded for the current run.
- The dedicated contact selection contains every current seed and no customer contacts.
- The marker appears unchanged in the subject or body.
- The final sender, domain, content, and links were used.
- The recipient count matches the MailSlurp seed count.
- Unengaged-contact suppression was off for the new controlled seeds.
- HubSpot accepted the send.
- The MailSlurp progress indicator reached its final state.
- Provider placement, content issues, and domain issues were reviewed.
Troubleshooting
MailSlurp does not recognize the campaign
Confirm the exact active marker appears in the delivered subject or body and that the current seed addresses were used.
The imported seeds are missing
Reopen the HubSpot contact selection, check field mappings and consent status, and wait for any asynchronous import or member-count refresh to finish.
Fewer results appear than expected
Confirm the campaign recipient count matched the seed count and that the run is still active. Keep the result open until the observation window resolves every target.
The campaign lands in spam
Review the provider row together with content and domain issues. Correct one meaningful variable at a time, then create a fresh run and send the complete revised campaign.
FAQ
What is a HubSpot inbox placement test?
It is a controlled send of the final HubSpot campaign to MailSlurp seed inboxes so you can observe destination folders across Gmail and Microsoft mailbox families.
Is a spam score the same as inbox placement?
No. Content and authentication checks identify risk signals; placement testing records what happened to the marked campaign at the controlled mailbox providers.
Can I reuse an old seed list?
Use the marker and seed addresses shown by the active run. A fresh run keeps the campaign revision and its evidence clearly connected.
Should the placement and device-preview emails be combined?
Keep them separate. A render address produces client screenshots, while a marked seed list produces provider placement observations.
After placement review, use the HubSpot device preview guide to inspect the delivered design across Gmail, Outlook, iPhone, Android, and desktop clients.