
guides
Okta OIDC and SCIM setup for MailSlurp environments
Configure Okta with a user-facing OIDC app tile and hidden SCIM provisioning for MailSlurp organizations with separate staging, QA, and test environments.
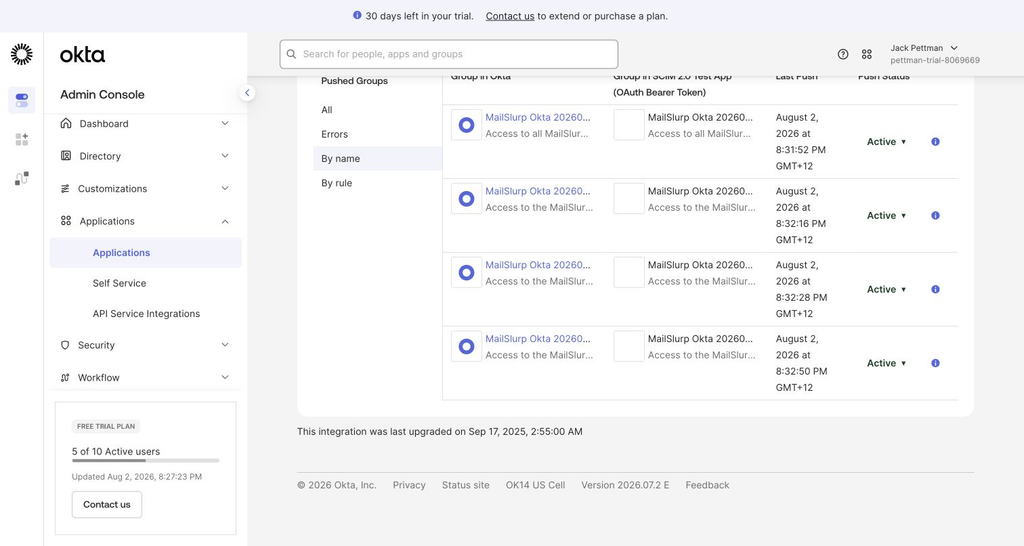
Use this guide to connect Okta to MailSlurp with OIDC single sign-on, SCIM provisioning, and role-based access to separate MailSlurp environments such as staging, qa, and test.
The recommended Okta setup uses two Okta applications:
- A user-facing OIDC web application. This is the app tile users click from the Okta dashboard.
- A hidden SCIM provisioning application. This app creates, updates, disables, and groups MailSlurp organization users.
Use the same Okta groups for both applications. The OIDC app controls who can sign in and which group claims MailSlurp receives during login. The SCIM app provisions users and groups into MailSlurp so MailSlurp can keep users, group memberships, and role assignments in sync.
If MailSlurp provides a published Okta Integration Network app for your tenant in the future, use that app's combined SSO and provisioning instructions when it explicitly supports both. Until then, the two-app setup is the reliable custom-app pattern.
How the environment model works
Configure OIDC and SCIM on one MailSlurp managing organization. That organization can grant access to multiple linked MailSlurp environment accounts.
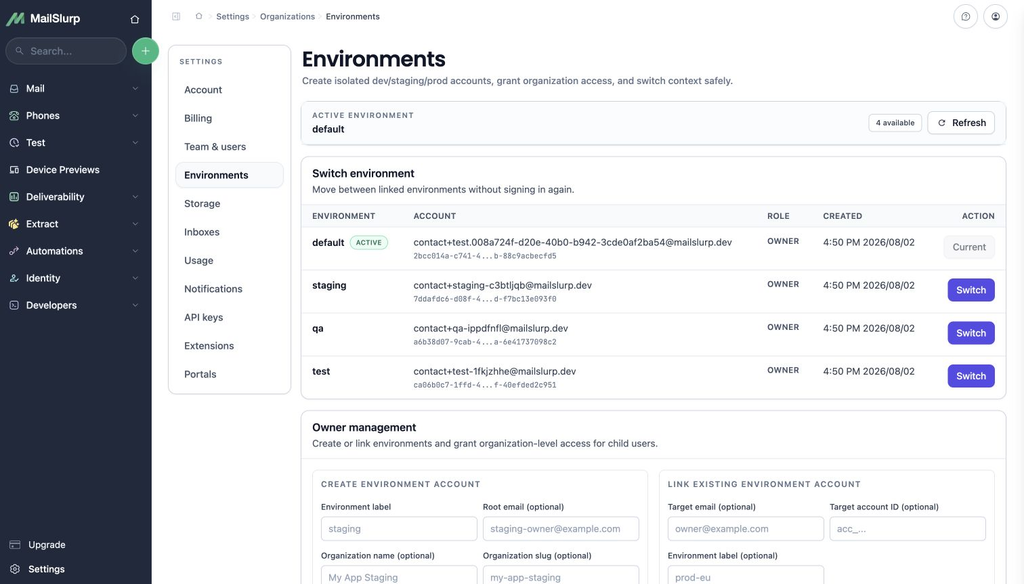
The access flow is:
- Okta groups represent environment access, for example
MailSlurp staging,MailSlurp qa,MailSlurp test, andMailSlurp all environments. - Okta SCIM pushes those groups and users into the MailSlurp organization.
- MailSlurp maps each SCIM group to a MailSlurp organization role.
- MailSlurp environment grants map each role to the matching environment.
- The Okta OIDC tile sends users to the MailSlurp OIDC login URL with
returnTo=/environment-landing. - MailSlurp signs the user in and routes them to the assigned environment. If the user can access more than one environment, MailSlurp shows the environment chooser.
Do not create a separate OIDC configuration in every MailSlurp environment unless each environment needs its own Okta app tile, assignment policy, administrator boundary, or issuer/client configuration. For most teams, one managing organization with role-restricted environment grants is easier to operate.
Requirements
Before starting, prepare:
- A MailSlurp Enterprise organization.
- MailSlurp owner or admin access for the organization.
- Okta administrator access.
- The MailSlurp environments users should access.
- Okta groups for each environment access set.
- Stable Okta user email addresses.
For SCIM-managed users, keep the Okta user email, SCIM userName, and MailSlurp OIDC email claim aligned. MailSlurp links the first OIDC login to the SCIM-provisioned user by email, then uses the OIDC issuer and stable sub subject for future logins.
Create MailSlurp environments and roles
In MailSlurp, open Settings > Environments.
Create one environment account for each isolated workspace:
stagingqatest
Then create MailSlurp organization roles for the access sets you want Okta to control:
Okta staging accessOkta QA accessOkta test accessOkta all environments access
Create environment access grants from the managing organization to each environment account. Restrict each grant to the matching MailSlurp role. Add the all-environments role to every grant when you want one administrator group that can enter all environments.
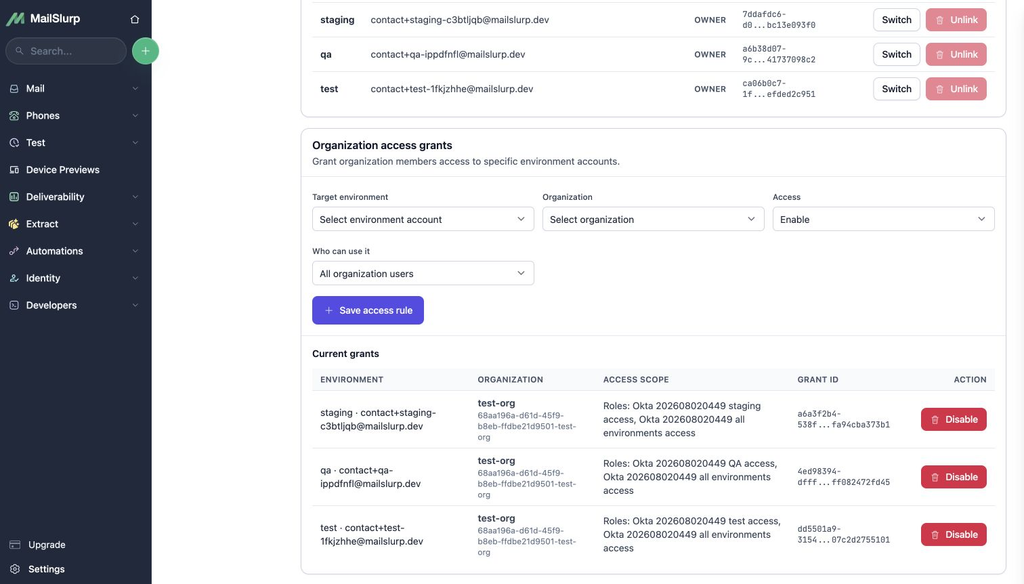
Enable SCIM in MailSlurp
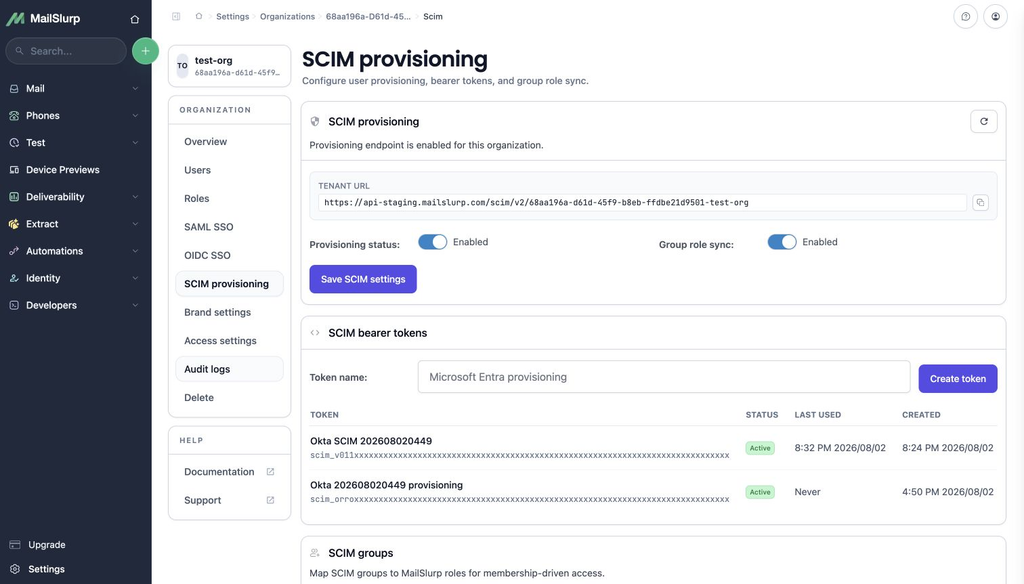
Open Settings > Organizations > your organization > SCIM provisioning.
Enable:
- Provisioning status
- Group role sync
Copy the SCIM Tenant URL and create a bearer token. Store the token securely because Okta needs it when configuring provisioning.
After Okta pushes groups for the first time, return to MailSlurp and map each SCIM group to the matching MailSlurp role.
Example mappings:
| Okta group | MailSlurp role |
|---|---|
MailSlurp staging |
Okta staging access |
MailSlurp qa |
Okta QA access |
MailSlurp test |
Okta test access |
MailSlurp all environments |
Okta all environments access |
When group role sync is enabled, MailSlurp applies the mapped role to existing SCIM group members when you save the group-role mapping. Future Okta group membership changes add or remove the SCIM-owned role automatically.
Create Okta groups and users
In Okta, create one group per environment access set:
MailSlurp stagingMailSlurp qaMailSlurp testMailSlurp all environments
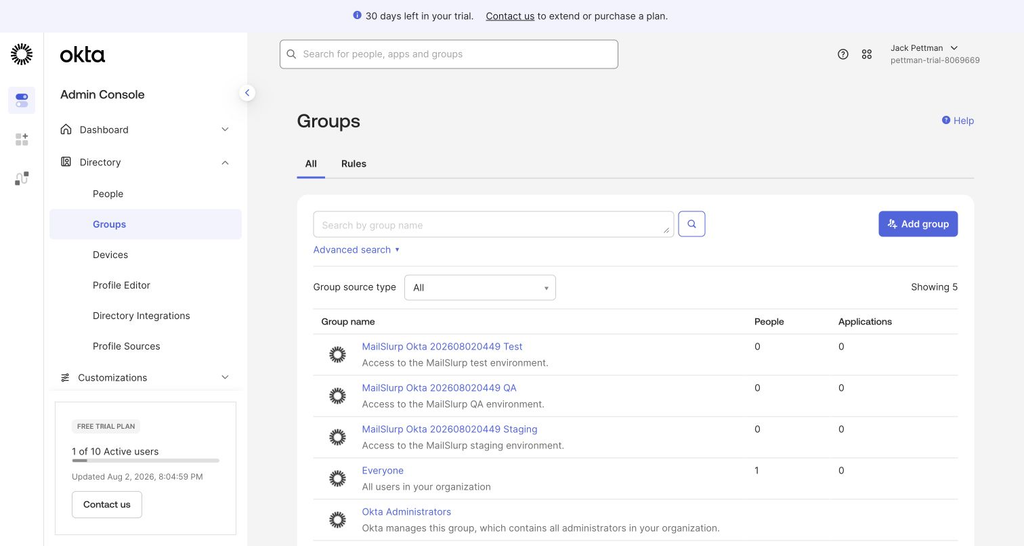
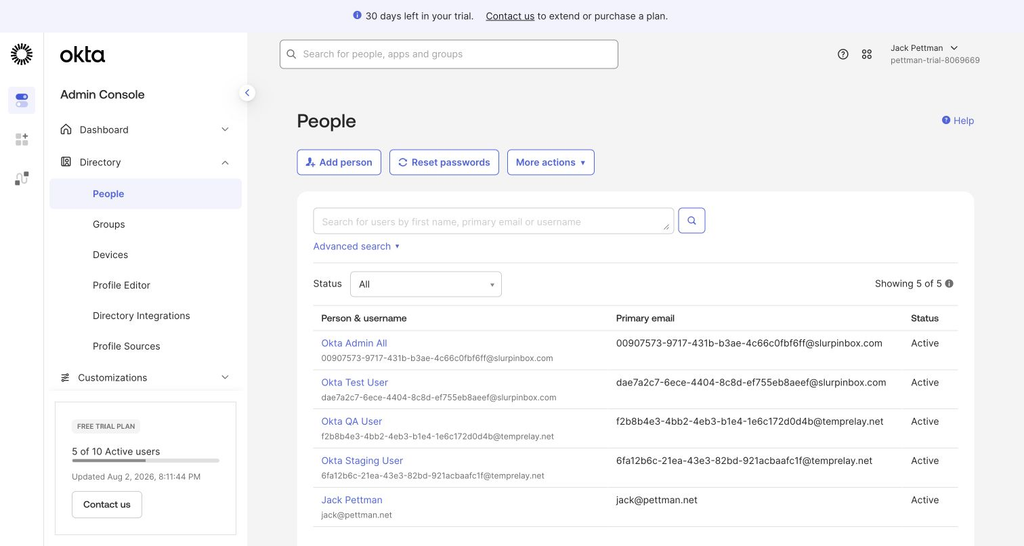
Create or identify the users that should be provisioned into MailSlurp.
Add users to the narrowest group that matches their access:
| User type | Okta group membership |
|---|---|
| Staging-only user | MailSlurp staging |
| QA-only user | MailSlurp qa |
| Test-only user | MailSlurp test |
| Administrator or release owner | MailSlurp all environments |
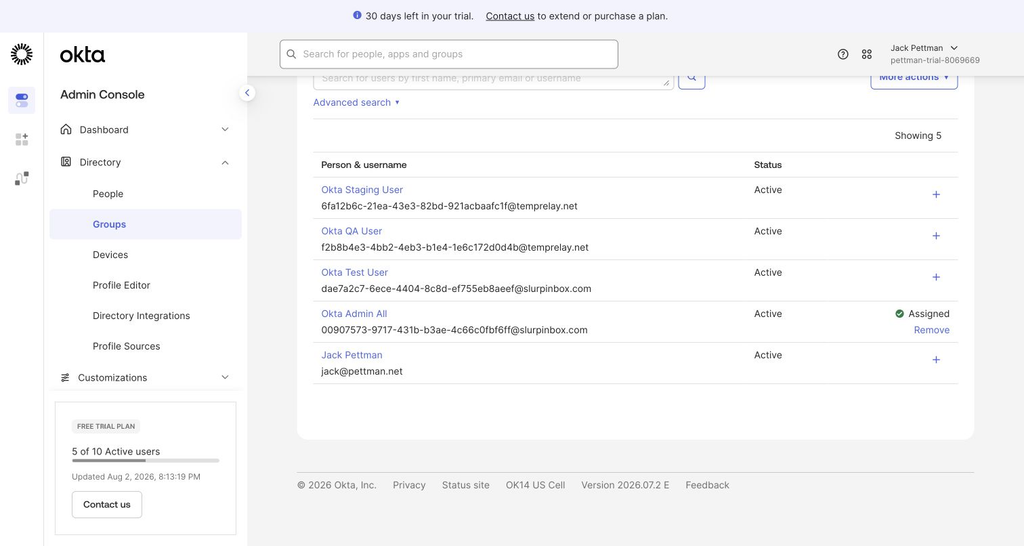
Users can belong to more than one group. MailSlurp combines the matching roles and environment grants. A user in only the staging group should be switched into staging after login. A user in the all-environments group should see the environment chooser when more than one linked environment is available.
Create the Okta OIDC app
In Okta Admin Console, open Applications > Applications and create an app integration.
Use:
| Okta setting | Value |
|---|---|
| Sign-in method | OIDC - OpenID Connect |
| Application type | Web Application |
| Grant type | Authorization Code |
| Sign-in redirect URI | MailSlurp OIDC redirect URI |
| Login initiated by | Either Okta or App |
| Initiate login URI | MailSlurp OIDC login URL with returnTo=/environment-landing |
| Controlled access | Assign the MailSlurp Okta groups |
In MailSlurp, the redirect URI and login URL are shown on the organization OIDC SSO page.
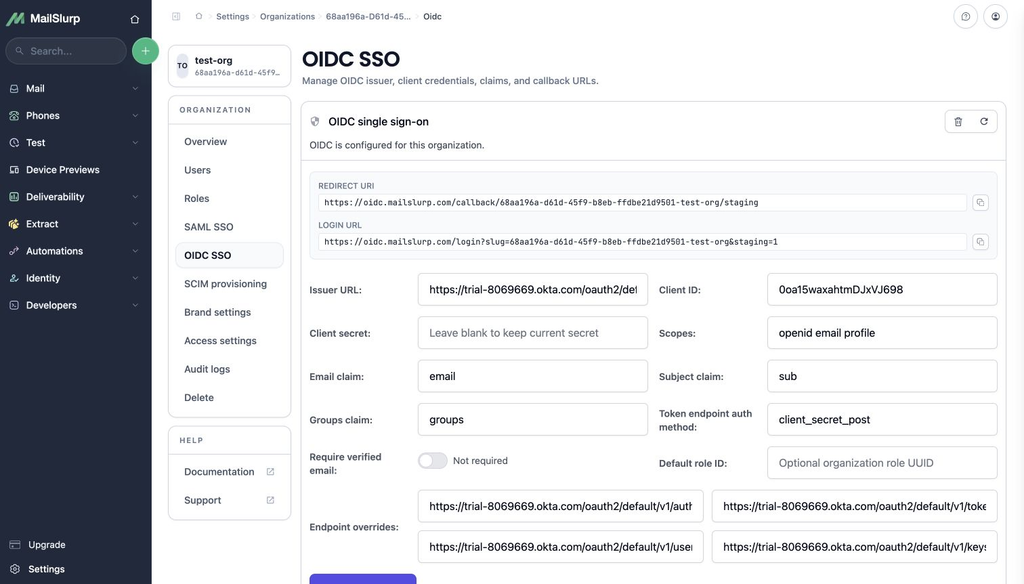
Copy the Okta client ID and client secret into MailSlurp OIDC settings.
For the Okta issuer URL, use the authorization server that issues the ID token. A common Okta default authorization server issuer is:
https://{yourOktaDomain}/oauth2/default
Set the Okta initiate-login URI to the MailSlurp environment landing login URL:
https://oidc.mailslurp.com/login?slug={organization-slug}&returnTo=%2Fenvironment-landing
Use the MailSlurp organization slug for the managing organization where OIDC and SCIM are configured.
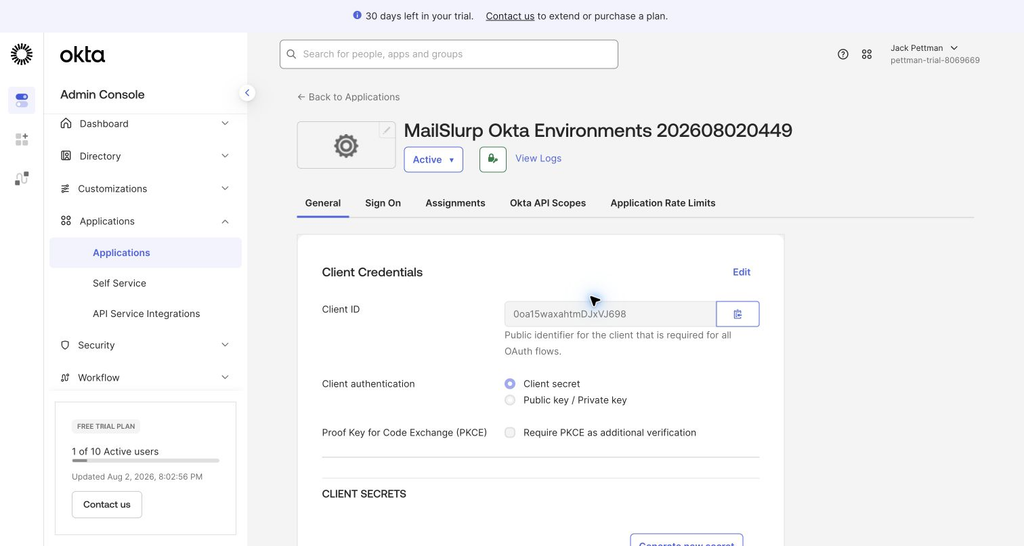
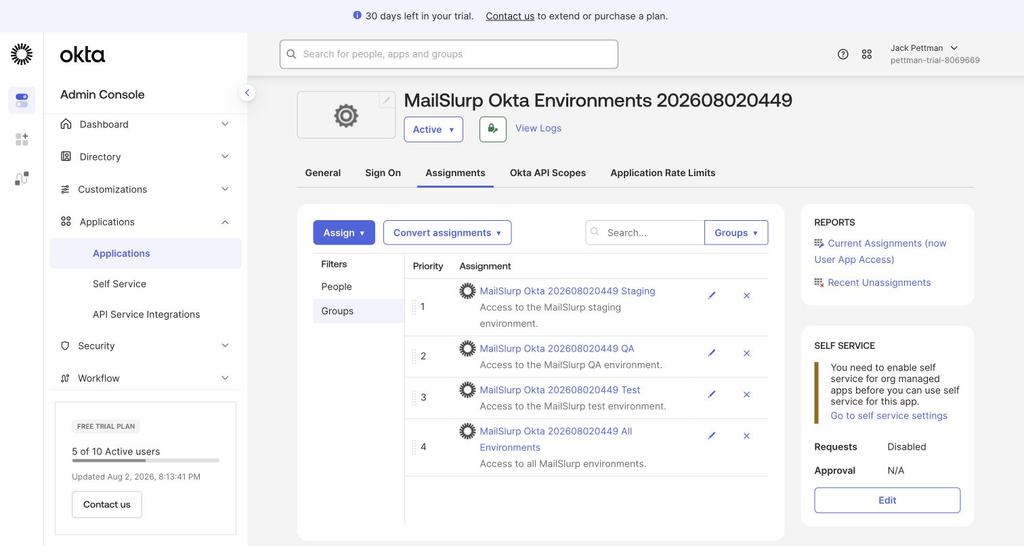
Assign the Okta groups to the OIDC app. These assignments control who can see and launch the MailSlurp tile.
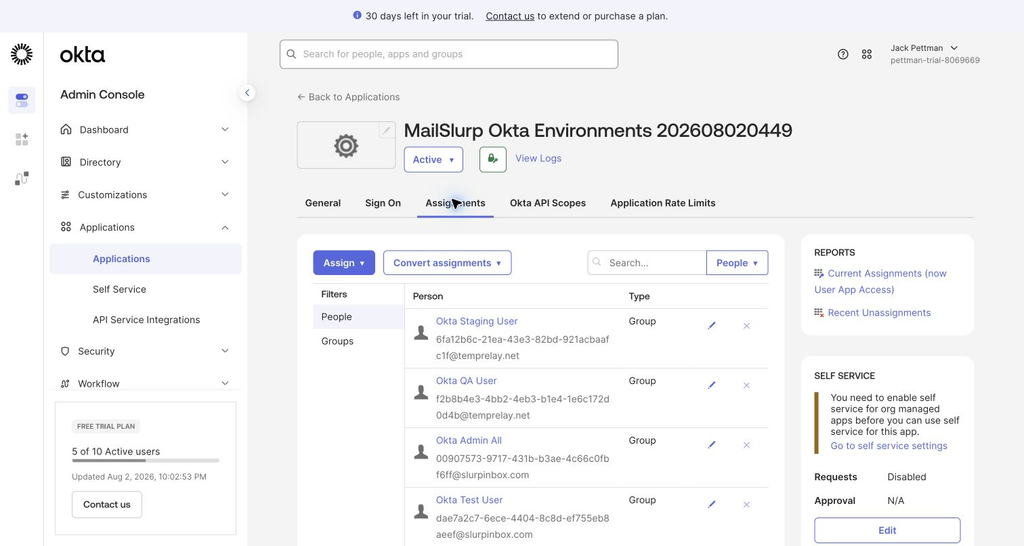
Confirm the app assignment list shows users inherited through the MailSlurp groups. Each user who should launch the tile must be assigned to the OIDC app, not just the SCIM app.
Add an Okta authorization server access policy
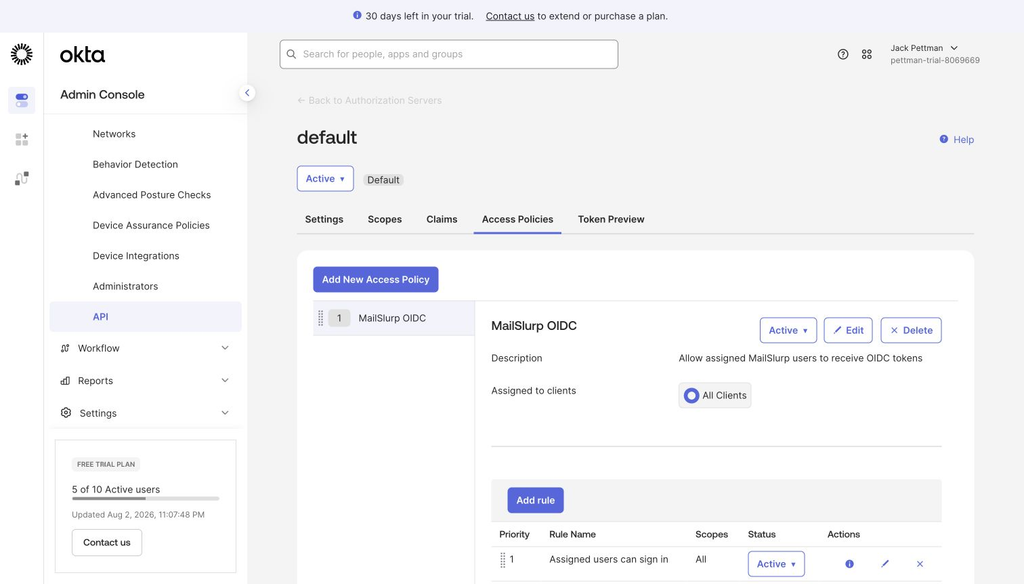
If your Okta issuer URL uses a custom authorization server such as https://{yourOktaDomain}/oauth2/default, the authorization server also needs an access policy and rule. Okta app assignment controls who can launch the app, but the authorization server policy controls whether Okta will issue OIDC tokens for that app.
In Okta Admin Console, open Security > API > Authorization Servers and select the authorization server used in the MailSlurp issuer URL. For the default issuer, select default.
Open Access Policies and add a policy for MailSlurp:
| Okta setting | Recommended value |
|---|---|
| Name | MailSlurp OIDC |
| Assign to | The MailSlurp OIDC client |
| Grant type | Authorization Code |
| User is | Any user assigned the app, or assigned the app and in the MailSlurp groups |
| Scopes requested | Any scopes, or openid, email, and profile |
| Inline hook | None |
For a dedicated test tenant you can assign the policy to All Clients while validating the setup. In production, scope the policy to the MailSlurp OIDC client when possible.
Save the policy and add an active rule before testing login. Without this rule, assigned users can pass the password step and still receive an Okta 403 before MailSlurp receives the OIDC callback.
Add an Okta groups claim
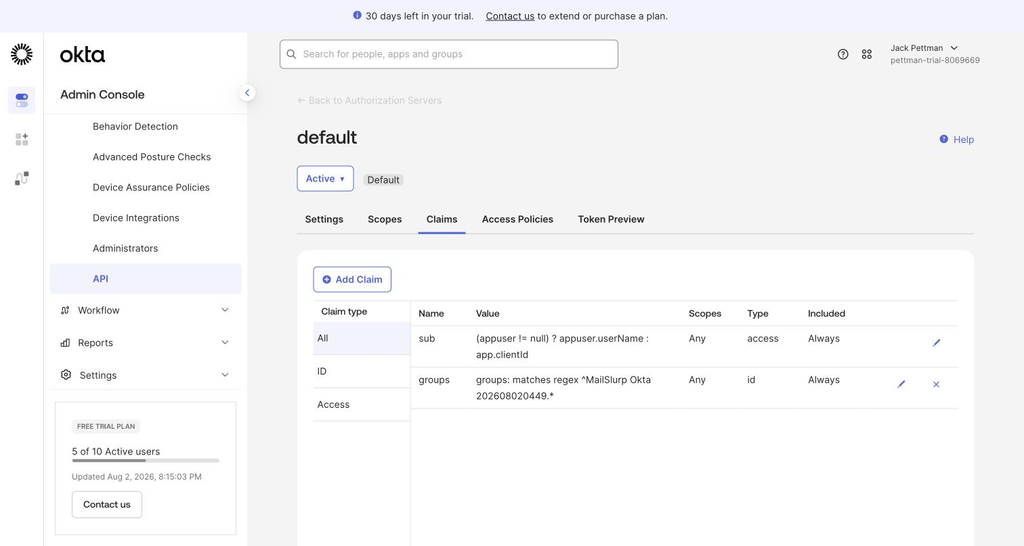
MailSlurp needs a group, role, or custom claim to assign MailSlurp roles from Okta. For the group-based environment model, add a groups claim to the Okta authorization server used by the OIDC app.
Use a filter that emits only the MailSlurp groups, for example:
^MailSlurp .*
Use a more specific prefix in production, such as ^MailSlurp production tenant .*, if the Okta tenant has many groups.
Save OIDC settings in MailSlurp
Back in MailSlurp, open OIDC SSO for the managing organization and enter:
| MailSlurp field | Okta value |
|---|---|
| Issuer URL | https://{yourOktaDomain}/oauth2/default |
| Client ID | Okta OIDC app client ID |
| Client secret | Okta OIDC app client secret |
| Scopes | openid email profile |
| Email claim | email |
| Subject claim | sub |
| Groups claim | groups |
| Token endpoint auth method | client_secret_post or the method required by your Okta app |
| Require verified email | Usually off unless Okta reliably emits email_verified: true |
Add MailSlurp OIDC role mappings for each Okta group claim value if you want OIDC login to update roles from ID token claims.
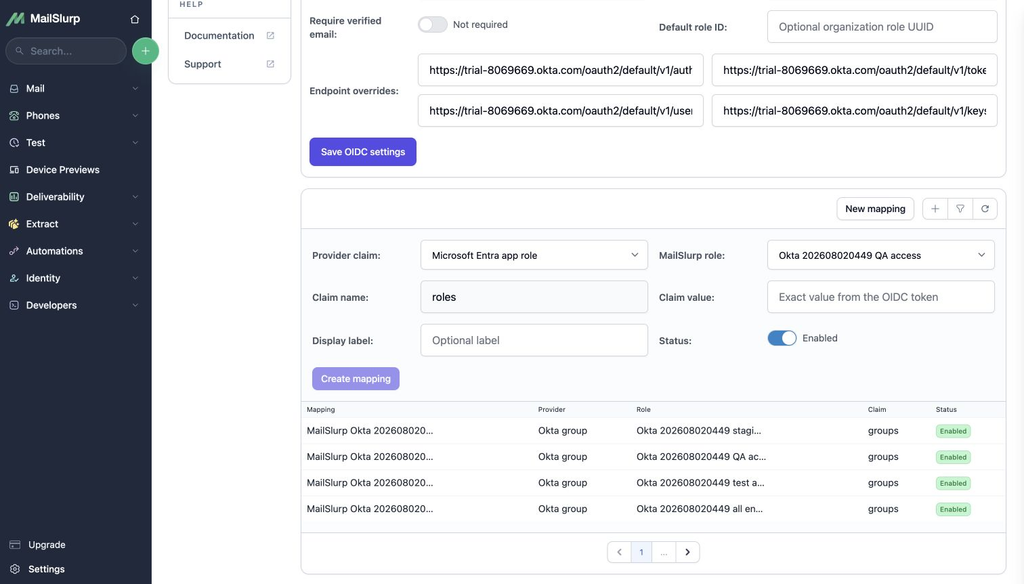
If you use SCIM group role sync, the same roles are also maintained by SCIM. Keeping OIDC role mappings in place is useful for sign-in-time role refresh, while SCIM remains the source for user lifecycle and group membership.
Create the Okta SCIM provisioning app
Create a second Okta application for SCIM provisioning. Use an Okta app integration that supports SCIM 2.0 provisioning with bearer token authentication, such as SCIM 2.0 Test App (OAuth Bearer Token) for a custom setup.
Because this application is only for provisioning, hide it from users. The visible user tile should be the OIDC app.
Configure provisioning with the values from MailSlurp:
| Okta SCIM setting | MailSlurp value |
|---|---|
| Base URL or Tenant URL | MailSlurp SCIM Tenant URL |
| API token or bearer token | MailSlurp SCIM bearer token |
| Unique user field | userName |
| Supported actions | Create users, update user attributes, deactivate users, push groups |
Test the SCIM credentials in Okta before saving.
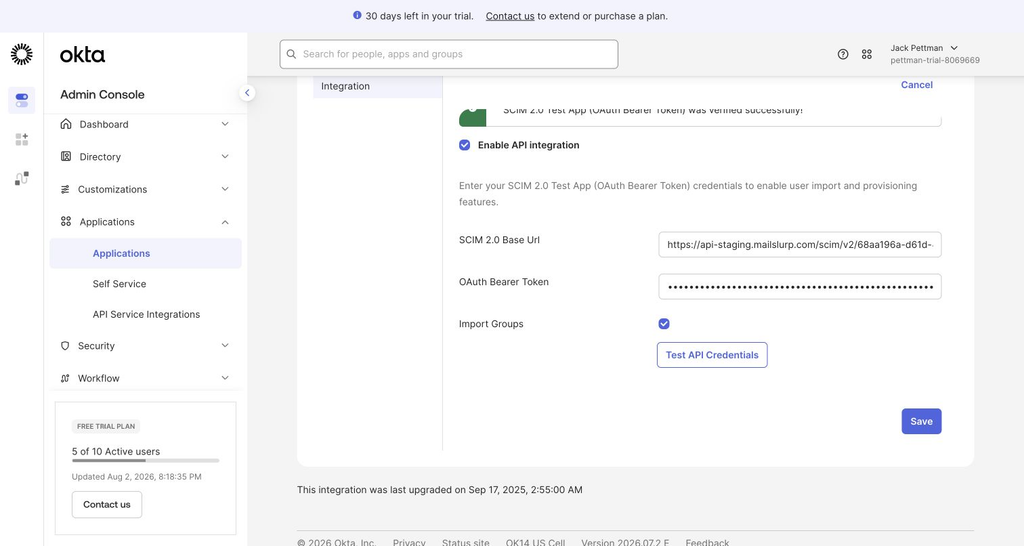
After the API connection is saved, enable Create Users, Update User Attributes, and Deactivate Users under Provisioning > To App. Leave password sync disabled when users authenticate through OIDC.
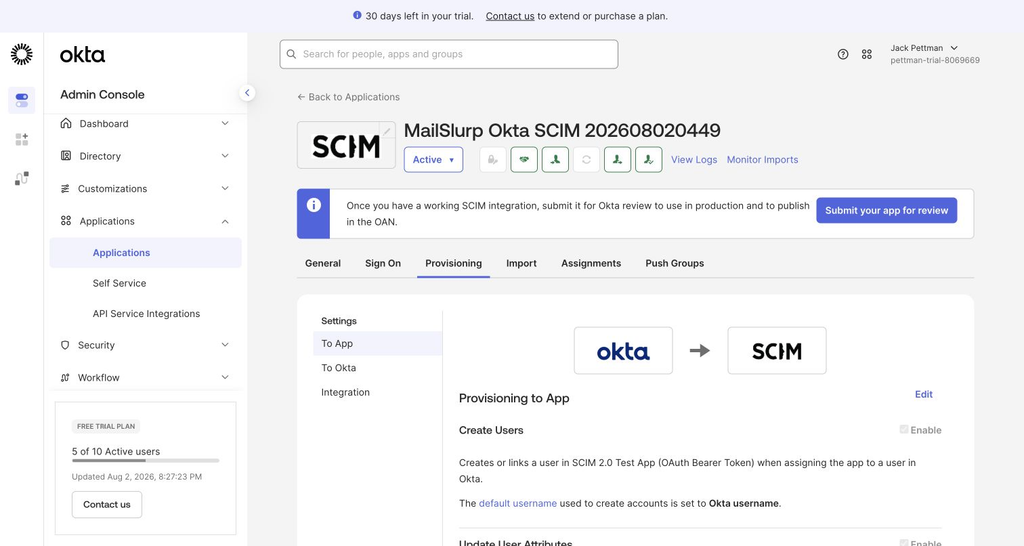
Assign the same Okta groups to the SCIM app that you assigned to the OIDC app.
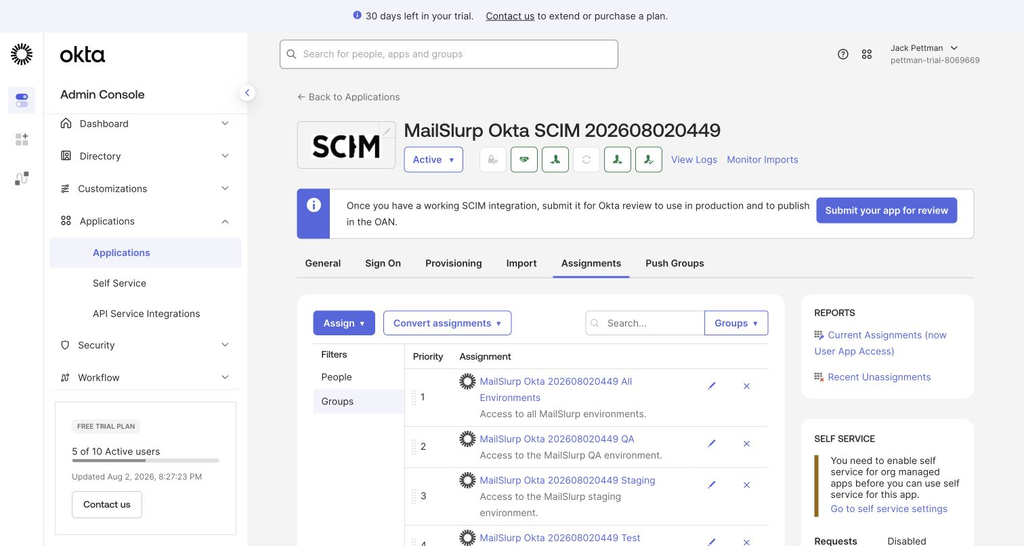
Push Okta groups to MailSlurp
Open the SCIM app Push Groups tab. Use Push Groups > Find groups by name, select each MailSlurp access group, and keep Push group memberships immediately enabled.
When Okta cannot find an existing app-side group, choose Create Group. Okta creates the SCIM group in MailSlurp and pushes membership.
After pushing groups, confirm in MailSlurp that:
- The users exist in the organization.
- The SCIM groups exist.
- Group member counts match Okta.
- Each group maps to the intended MailSlurp role.
- Each user has the role that matches their Okta group.
Test the Okta tile
Open the Okta dashboard as an assigned user and click the MailSlurp OIDC tile.
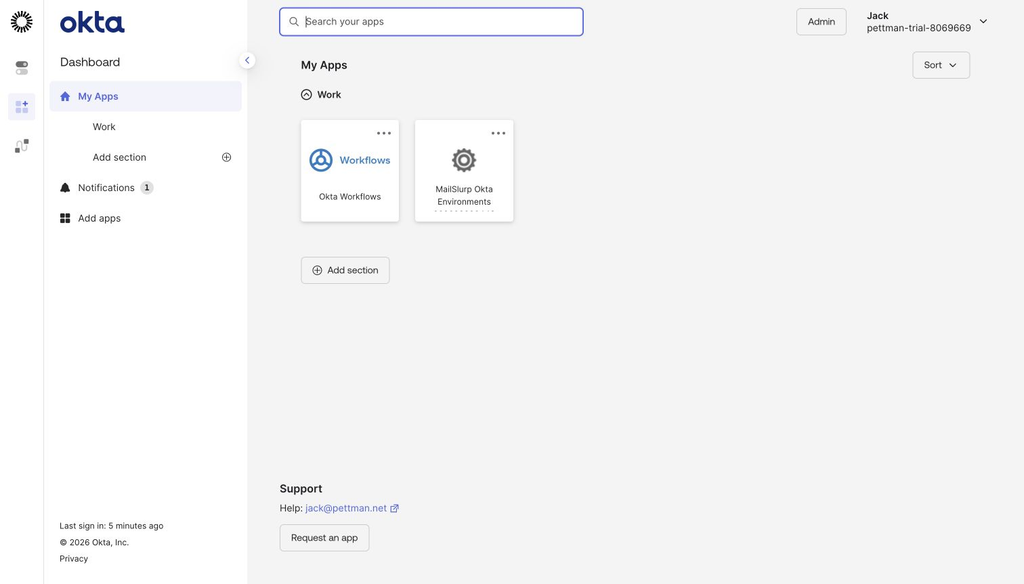
Expected results:
| Test user | Expected MailSlurp result |
|---|---|
| Staging-only user | Signs in and switches into staging |
| QA-only user | Signs in and switches into qa |
| Test-only user | Signs in and switches into test |
| All-environments user | Signs in and sees the environment chooser |
If the user has exactly one non-default linked environment, MailSlurp switches to that environment automatically. If the user can access multiple environments, MailSlurp shows the chooser so the user can pick the correct environment.
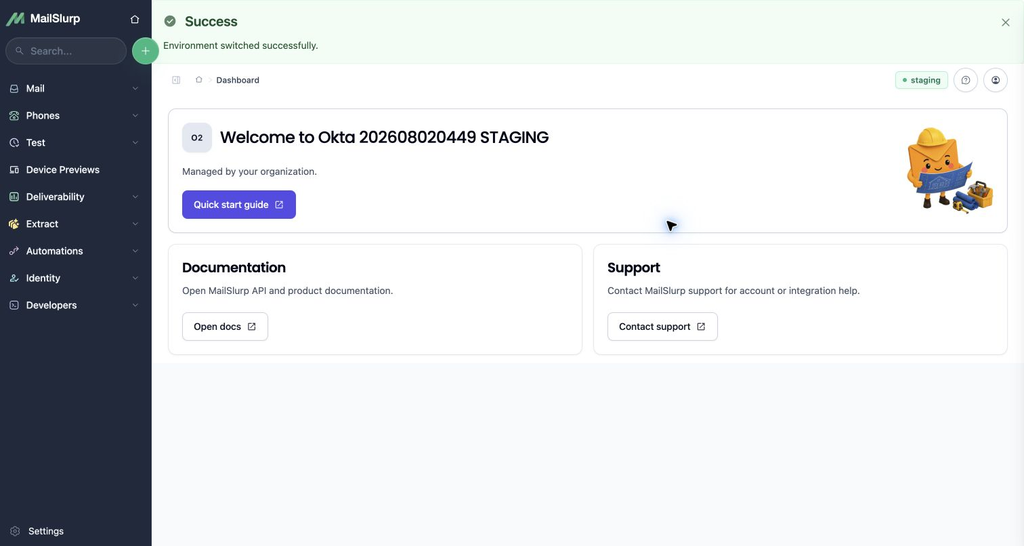
After a successful single-environment login, MailSlurp shows a success message and the target environment name in the dashboard.
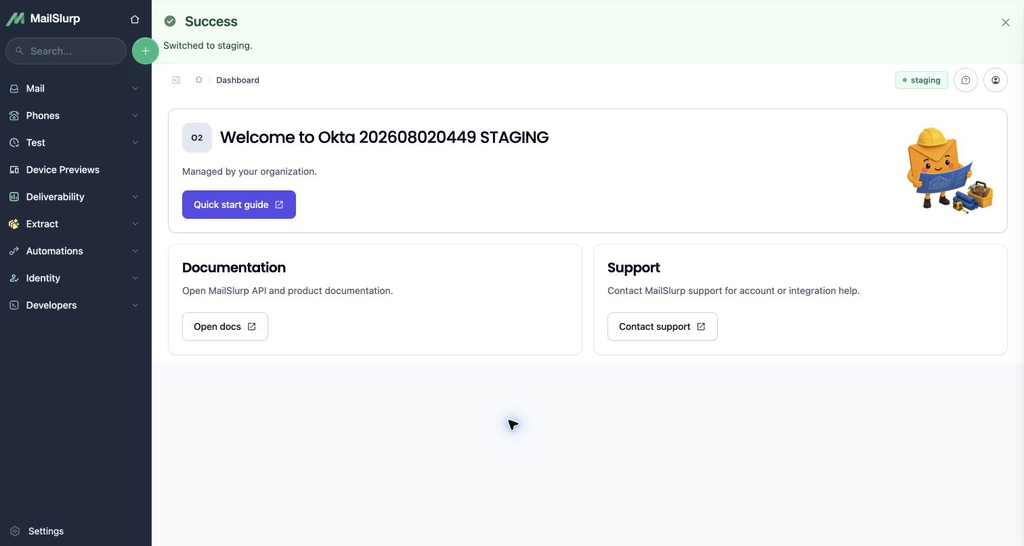
Confirm the same single-environment user cannot switch into other environments. Open Settings > Environments or the environment switcher as that user. Only the allowed environment and the default account context should be available.
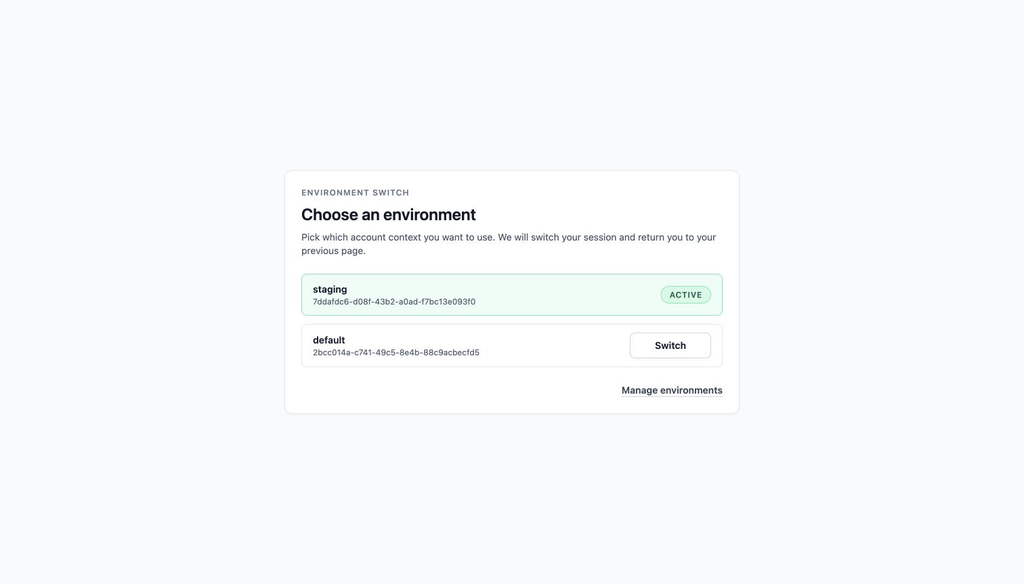
After a successful all-environments login from the Okta tile, MailSlurp shows the environment chooser with each environment the user's roles can access.
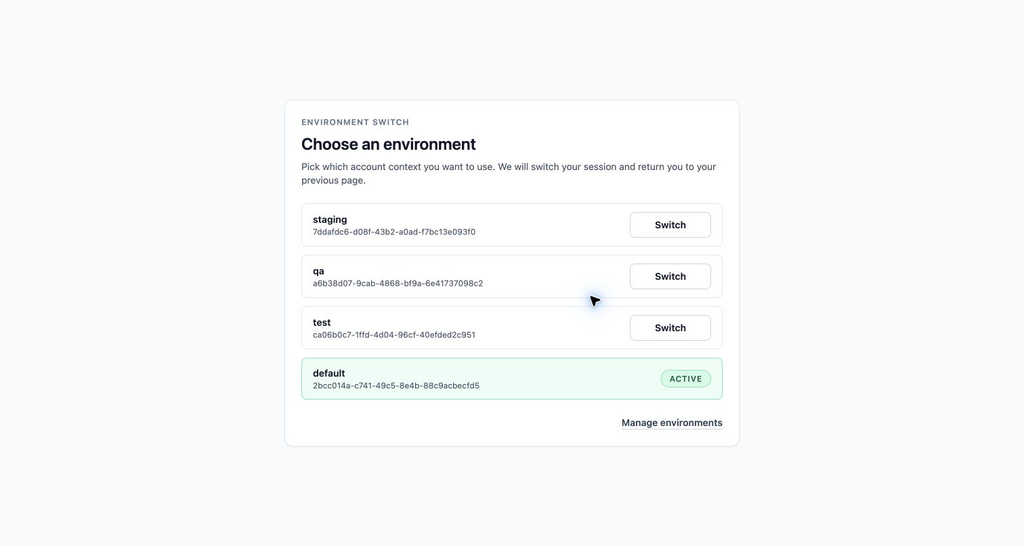
Selecting another environment switches the MailSlurp account context and returns the user to the dashboard.
Okta may ask a new test user to enroll required security methods before showing the dashboard. Complete the Okta enrollment or adjust the Okta authenticator enrollment policy for the test group, then retry the tile launch. This prompt happens before OIDC reaches MailSlurp.
Troubleshooting
The Okta tile is not visible
Confirm the user or one of their groups is assigned to the OIDC application. The SCIM app does not need to be visible to users.
Okta shows 403 after the password step
Confirm the OIDC app assignment first. If the assignment is correct and your issuer is an Okta custom authorization server such as /oauth2/default, check Security > API > Authorization Servers > your authorization server > Access Policies. Add an active policy rule that allows the MailSlurp OIDC client to use the Authorization Code grant.
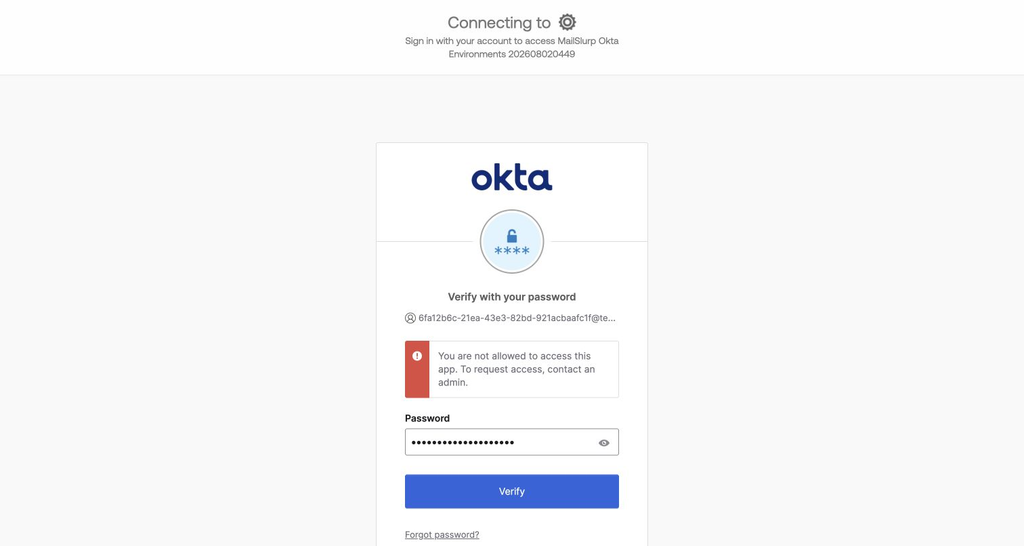
Okta asks the user to set up security methods
Complete the Okta Verify or authenticator enrollment required by your Okta policy, or adjust the test policy for the assigned Okta group. MailSlurp does not receive an OIDC callback until Okta completes this step.
Okta says the user is not assigned
Assign the user or their group to the OIDC app. Assigning only the SCIM app is not enough for tile launch or OIDC sign-in.
MailSlurp signs the user in but shows no environment
Check the user's MailSlurp roles and the environment access grants. The user must have a role allowed by the target environment grant.
SCIM users appear but roles do not update
Confirm group push is enabled for the Okta groups and that MailSlurp SCIM group role sync is enabled. Each pushed SCIM group must be mapped to a MailSlurp role.
OIDC role mappings do not apply
Check the Okta ID token and confirm it contains the configured groups claim. The MailSlurp role mapping must match the emitted claim name and value exactly.
The wrong MailSlurp user is linked
Make sure the MailSlurp OIDC email claim matches the same email value that SCIM provisions for the user. Keep the subject claim set to Okta sub. If the Okta app was recreated or the subject claim changed intentionally, ask a MailSlurp organization admin or MailSlurp support to reset the affected user's OIDC link before retrying.