
How to Preview Brevo Emails in Gmail, Outlook, iPhone, and Android
Send a Brevo campaign through its Test List, compare Gmail, Outlook and iPhone previews in MailSlurp, and check dark-mode contrast before launch.
Use with your tools
Before sending a Brevo campaign, check how its images, text and buttons appear in the inbox. The editor preview helps you compose the message, but a customer opening it in Outlook or Gmail may see different spacing, image sizes or colors.
Repeating that check after edits means sending tests to several mailboxes and gathering screenshots from each app. MailSlurp is an email testing platform with automated device previews that collects those captures for comparison.
For the product overview and supported client families, open the Brevo email preview page.
How automated device rendering works
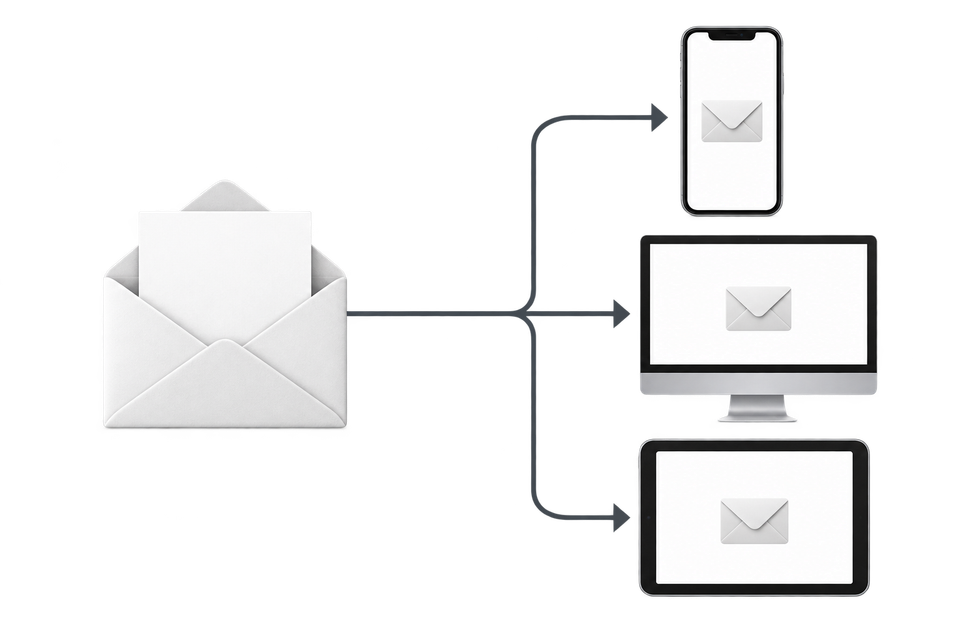
Choose the devices and email services you want to test, and MailSlurp gives you a special email address. Send your campaign to that address. MailSlurp opens the email in the selected apps and webmail services, then captures screenshots automatically.
The screenshots come back together, ready to compare across phones, tablets and computers. Check the layout, images and buttons, then share a result link so your team can review the same version of the email.
Quick answer
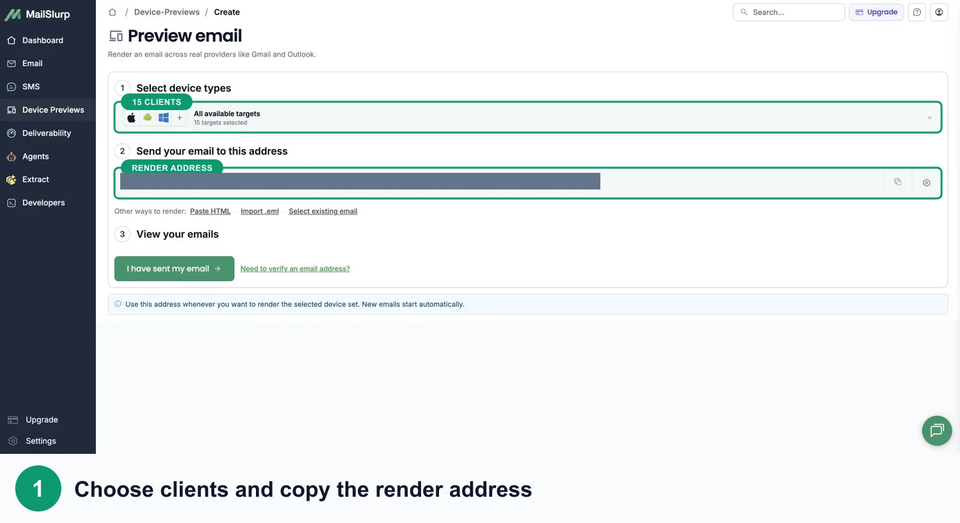
Create a MailSlurp device preview, choose your clients, click Use selected and copy its address. Add that address as a Brevo contact and then to Settings > Campaigns > Test List. In the campaign's Preview & test dialog, open Send test email, select the address and click Send Test. Review the completed client captures in MailSlurp.
Use the final campaign content for this run. Finish the sender, subject, preview text, images, links, footer, unsubscribe content, and personalization before sending the test.
Watch the Brevo email preview workflow
This walkthrough shows the Brevo and MailSlurp flow from preparing the test recipient through reviewing the completed device renders.
Before you begin
Prepare the campaign version you want to approve, including its images, button destinations and footer. If it uses contact attributes, put representative values on the test contact so the delivered message contains useful examples of that personalization.
Brevo requires an address to exist as a contact before it can join the Test List, which supports up to 20 addresses. See Brevo's test-list instructions for the account setup.
Send the Brevo campaign for device testing
The example campaign asks readers for feedback, with a large illustration, a short message and a green button. The illustration should fit the content column and the button should remain readable on a phone. Follow the same send process with your own campaign, then inspect the details that matter to its design.
Step 1: Create a MailSlurp device preview
Open Device Previews in MailSlurp and start a new render. Expand the selector and choose the apps your customers use. For an iPhone, Gmail iOS, iOS Mail and Outlook iOS are separate checks; the iPhone Mail guide explains Apple's app in more detail.
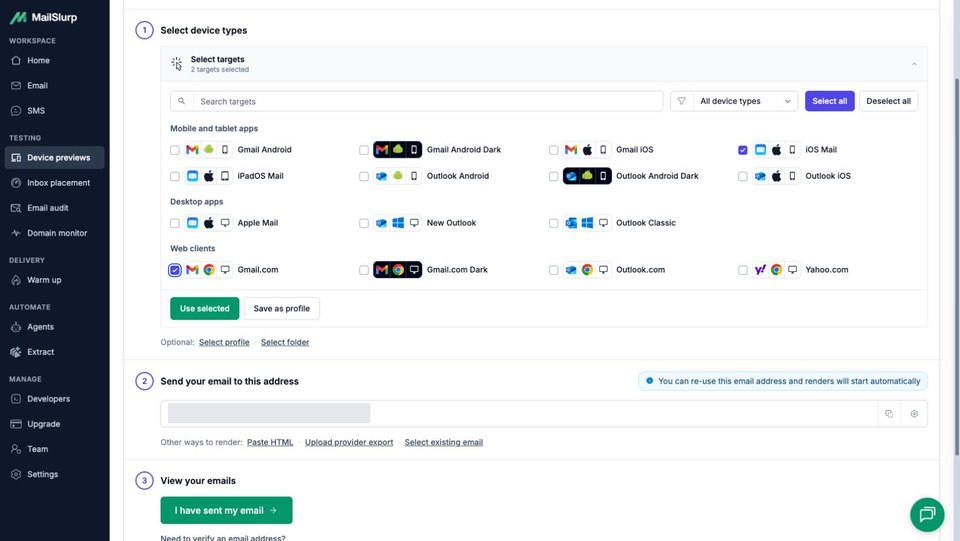
For desktop review, select the relevant webmail and desktop apps rather than treating Outlook.com, New Outlook and Outlook Classic as interchangeable. Add Gmail Android and Gmail Android Dark if you want a matched light/dark check. Click Use selected to confirm the targets, then copy the address under Send your email to this address.
Step 2: Add the render address to the Brevo Test List
In Brevo, open the account menu and choose Settings. Under Campaigns, find Test List and choose Set up or Manage.
Add the MailSlurp render address as a Brevo contact if it does not already exist. Then add it to the Test List, one address per line, and save the list. Brevo may require a page refresh before a newly added recipient appears in the campaign dialog.
Keep the Test List focused. Remove old render addresses when they are no longer needed so the active recipient is easy to identify.
Step 3: Open Preview & test in Brevo
Open the final Brevo email campaign. Check the sender, subject, preview text, design, tracking, and recipients, then choose Preview & test.
The Preview tab lets you select a contact and inspect its attributes. View in inbox is a separate, plan-dependent client-preview feature. For this MailSlurp run, choose Send test email to deliver the message to the render address. Brevo's preview and test documentation explains these options.
Step 4: Send the Brevo test email
Open Send test email. Under Recipients, select the MailSlurp render address and click Send Test.
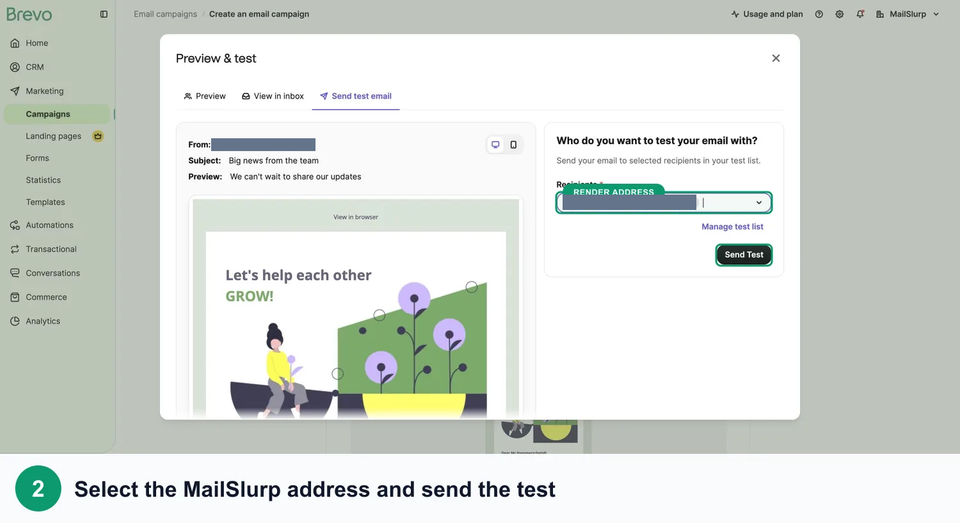
The received example below has TEST - at the start of its subject. Check your campaign's intended subject separately before scheduling it.
Step 5: Wait for all selected clients
After Brevo confirms the test was sent, return to MailSlurp and click I have sent my email. The received message starts the render run automatically. Click View results when it appears in the waiting dialog, then wait until every required target shows Ready.
The completed example below contains 15 ready captures from the same Brevo campaign.
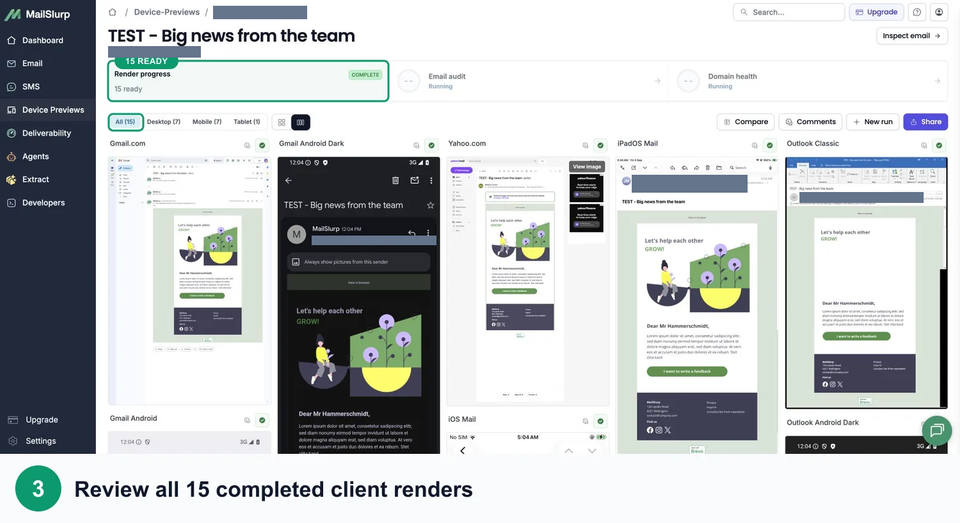
If a required capture fails, resolve or retry that target before approving it. A completed screenshot confirms a capture exists; open it to decide whether the email itself passes.
Review the Brevo email in each client
The grid helps you find broad differences, but smaller text and the footer need a full-size review. Start with the apps most important to your campaign, then compare any result that differs from the intended design.
Step 6: Inspect and compare the renders
Open a completed result and use Compare to view another target from the same send alongside it.
Check:
- headline wrapping and body width
- mobile stacking and horizontal overflow
- hosted image loading, dimensions, cropping, and alternative text
- button width, contrast, and tap area
- font fallbacks and line-height changes
- Outlook Classic spacing and table alignment
- New Outlook and Gmail web differences
- iPhone and Android responsive spacing
- footer, unsubscribe, preference, and legal content
- light and dark mode contrast
If one client breaks, update the Brevo template, send the revised test email to the same active render address, and review the new run.
Check Brevo email colors in dark mode
The example grid includes a Gmail Android Dark capture with a dark message body. It shows that one appearance; it is not a full-size light/dark comparison. For your campaign, select Gmail Android and Gmail Android Dark together and compare the same sent revision, using the Gmail Android dark-mode walkthrough for the inspection steps.
Check the logo, text within images, body copy, button and footer separately. If a dark logo becomes hard to see, review its image treatment and the block behind it. Brevo's dark-mode design guidance describes transparent PNGs, contrast treatments and an optional image-block background in the Drag & Drop editor. Choose a treatment appropriate to the artwork, then resend and check both appearances; transparency alone does not ensure contrast.
For an illustrated diagnosis, the dark-mode logo comparison shows the symptom in a separate saved email imported into MailSlurp.
Brevo email preview checklist
Before launching the campaign, confirm:
- the latest Brevo campaign version was sent
- representative contact data was applied
- the final subject, preview text, sender, and reply handling are correct
- every priority web, mobile, and desktop render is ready
- images load and scale correctly
- mobile content remains readable without horizontal scrolling
- buttons remain visible and easy to tap
- Outlook Classic preserves the intended hierarchy
- footer and unsubscribe content are present
- the preview was rerun after the last template change
Troubleshooting Brevo device previews
The render address does not appear in Brevo
Confirm the address exists as a Brevo contact and is included in Settings > Campaigns > Test List. Save the list, refresh the campaign page, and reopen Preview & test.
MailSlurp does not detect the email
Copy the complete render address again, confirm that the correct Test List recipient is selected, and check that Brevo reported a successful test send.
Personalized values are missing
For contact attributes, update the Brevo contact tied to the render address, select that contact in Preview, then send a fresh test. Transactional parameters need their own test data; editing a contact does not supply an order or other transactional payload. Follow the parameter-testing instructions linked from Brevo's preview documentation when the message uses those values.
Images are missing in one client
Use absolute HTTPS image URLs and confirm they are publicly reachable without authentication. Compare the failing client with another completed render, correct the Brevo campaign, and rerun the exact message.
Outlook spacing differs from Gmail
Name the affected app first: Outlook Classic, New Outlook and Outlook.com can behave differently. The Outlook client guide helps you select the matching target.
In Brevo's Drag & Drop editor, check the affected image's margins, the spacing of its surrounding block and the text line height. If the whole message is too wide, look for a long bare URL and replace it with a link on descriptive text. If only a button's font changes, remove any unwanted spaces at the start or end of its label. These are focused checks from Brevo's Outlook troubleshooting article, not guaranteed fixes for every Outlook app.
Send the changed campaign again and compare the exact target that failed. For a demonstrated background and button repair, the Outlook rendering article uses a separate controlled email to compare Classic with New Outlook and verify a Classic fix.
FAQ
How do I preview a Brevo email in Gmail and Outlook?
Create a MailSlurp device preview, copy its render address, add that address to the Brevo Test List, and select it for a Brevo Send Test. MailSlurp captures the received campaign in each selected Gmail and Outlook target.
Can I preview Brevo emails on iPhone and Android?
Yes. Include iOS Mail, Gmail iOS, Outlook iOS, Gmail Android, and Outlook Android in the MailSlurp client set.
Does Brevo's editor preview replace email client testing?
Brevo's preview helps during composition. A MailSlurp run adds captured evidence from the delivered message across multiple web, desktop, and native mobile clients.
How many recipients can the Brevo Test List contain?
Brevo currently documents a limit of 20 Test List addresses. Keep the active MailSlurp render address and essential internal reviewers in that list.
When should I rerun the preview?
Rerun after changing copy, contact attributes, images, links, layout, sender details, footer content, or campaign settings. Approve only the latest delivered Brevo message.
After visual approval, continue with the Brevo inbox placement and spam score guide to measure where the campaign lands. The complete dashboard workflow is in the device preview documentation.