
SAML SSO configuration for MailSlurp
Documentation navigation
Configure SAML single sign-on for MailSlurp organizations with service-provider values, identity-provider metadata, attribute mapping, and a controlled login test.
Configure SAML single sign-on for MailSlurp organizations using a guided identity provider setup in the MailSlurp dashboard. Choose Microsoft Entra ID, Google Workspace, Okta, or Custom SAML 2.0, then copy values between MailSlurp and your identity provider.
Use this page when you are:
- Enabling SSO for a team organization.
- Disabling email-login flows and enforcing IdP-based access.
- Configuring provider metadata and certificate settings.
For organization structure, roles, and governance patterns see:
- Team accounts
- Roles and permissions
- Environments
- SCIM provisioning
- Entra SAML role mapping
- Google Workspace SAML role mapping
Before you start
- Ensure your subscription plan supports SAML sign-in.
- Create the target organization in the MailSlurp dashboard.
- Confirm your IdP admin has permission to create and configure enterprise applications.
- Decide which integration you will use: Microsoft Entra ID, Google Workspace, Okta, or Custom SAML 2.0.
Create a SAML integration in MailSlurp
1. Upgrade account for SSO
Ensure you have a plan that supports SAML sign-in or follow the upgrade guide if you don't.
2. Create an organization
Create an organization in the MailSlurp app.
3. Open SAML settings for the organization
Click the SAML settings tab on the organization overview:

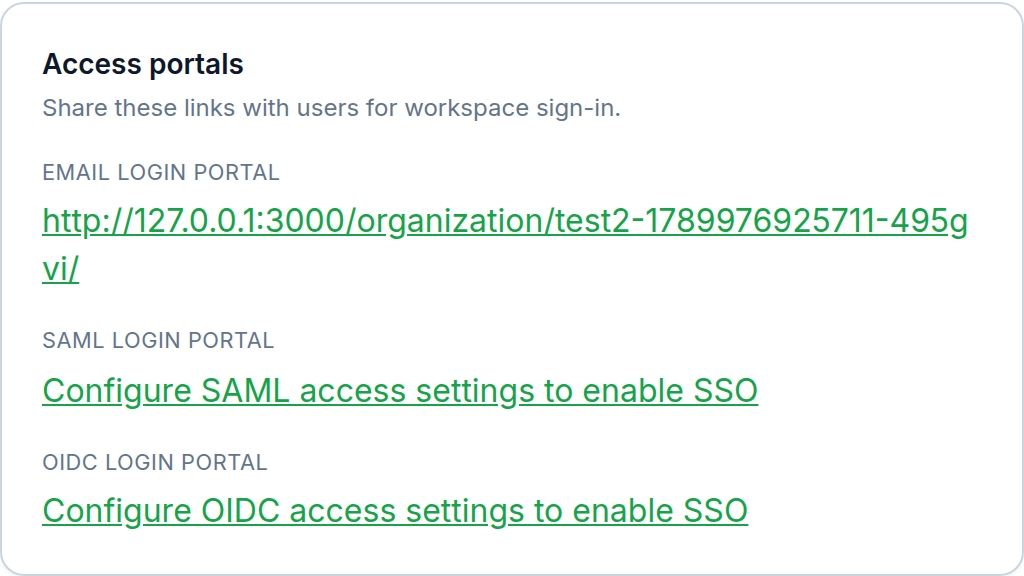
Or click the configure SAML link in the access portal card:
4. Select an IdP integration
On the create page choose one of the provider cards at the top of the form:
- Microsoft Entra ID
- Google Workspace
- Okta
- Custom SAML 2.0
After you choose a provider, MailSlurp shows a guided setup with numbered steps:
- Select IdP integration.
- Add MailSlurp in your identity provider.
- Paste identity provider values into MailSlurp.
If you later edit an existing SAML integration, MailSlurp opens the generic configuration form directly.
Service provider reference
Configure your application integration in your identity provider with these MailSlurp SAML values.
| Name | Value |
|---|---|
| Provider name | mailslurp |
| Name ID format | urn:oasis:names:tc:SAML:1.1:nameid-format:emailAddress |
| Audience URI service provider entity ID | mailslurp-enterprise |
| Service provider metadata XML | https://enterprise.mailslurp.com/metadata?slug=[YOUR_SLUG] |
| Assertion consumer service endpoint ACS URL Redirect | https://enterprise.mailslurp.com/saml/[YOUR_SLUG]/ |
| Assertion consumer service endpoint ACS URL Post | https://enterprise.mailslurp.com/saml/[YOUR_SLUG]/ |
Common field mapping
Use this table when translating between MailSlurp labels and provider-specific labels.
| MailSlurp | Google Workspace | Microsoft Entra ID | Okta | Custom SAML |
|---|---|---|---|---|
| ACS URL | ACS URL | Reply URL (Assertion Consumer Service URL) | Single sign-on URL | ACS URL / Reply URL |
| Entity ID or Audience URI | Entity ID | Identifier (Entity ID) | Audience URI (SP Entity ID) | Entity ID / Audience URI |
| SSO URL or Login URL | SSO URL | Login URL | Sign on URL | SSO URL / Login URL |
| Issuer or Entity ID | Entity ID | Microsoft Entra Identifier | Issuer | Issuer / Entity ID |
| Signing certificate (X.509) | Certificate | Certificate (Base64) | X.509 Certificate | Signing certificate |
| Name ID format | Name ID format | Name identifier format | Name ID format | Name ID format |
Microsoft Entra ID setup
1. Select Microsoft Entra ID in MailSlurp
Start the SAML create flow in MailSlurp and choose the Microsoft Entra ID provider card.
2. Create or open the enterprise application in Entra
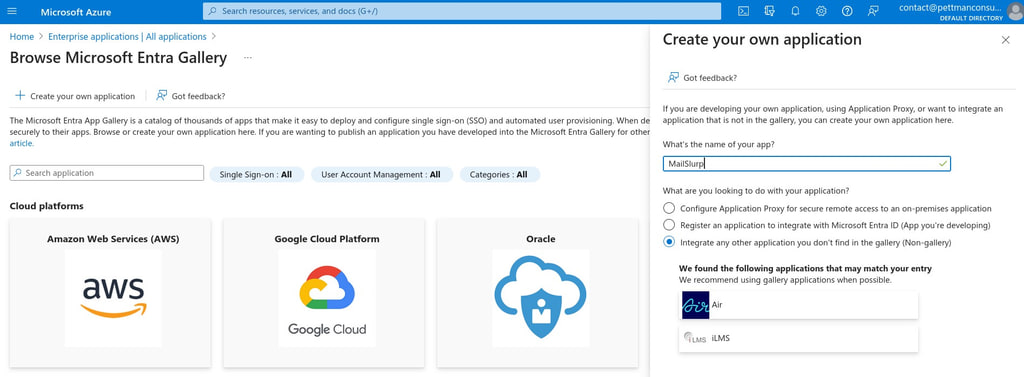
In Microsoft Entra admin center, open Enterprise applications and create a new non-gallery application for MailSlurp.
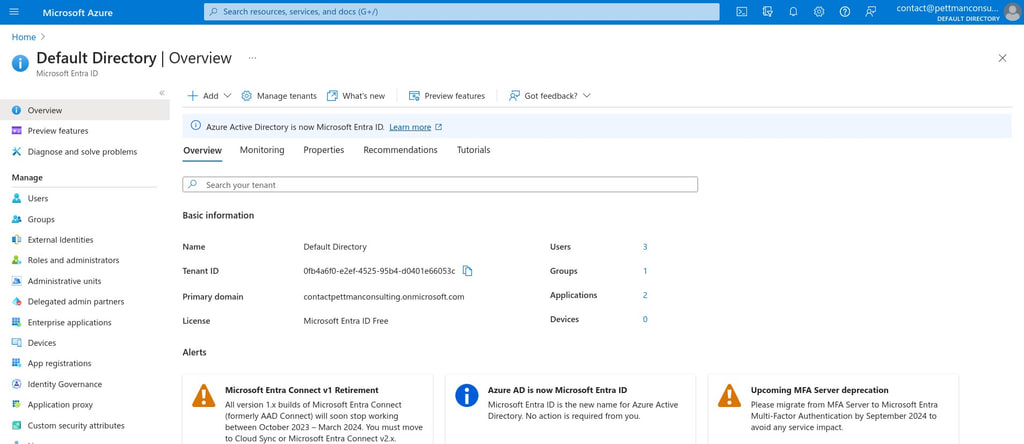
Open Entra ID in the Azure portal:
Add a non-gallery application:
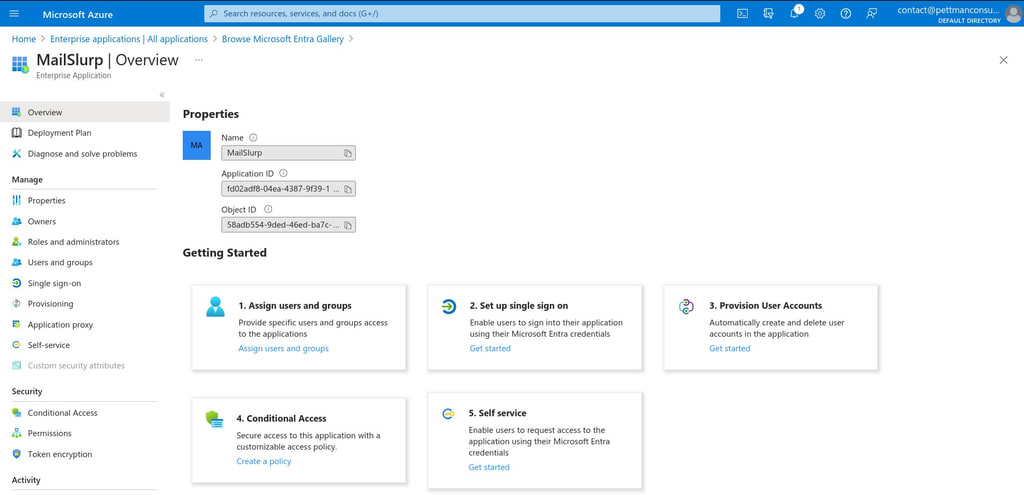
On the application overview choose Set up single sign on:
Select SAML:
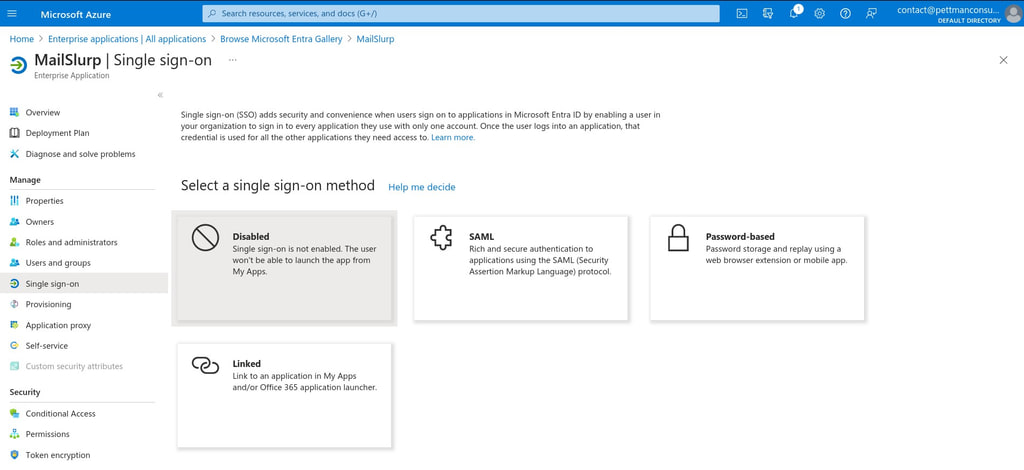
3. Configure Entra with MailSlurp values
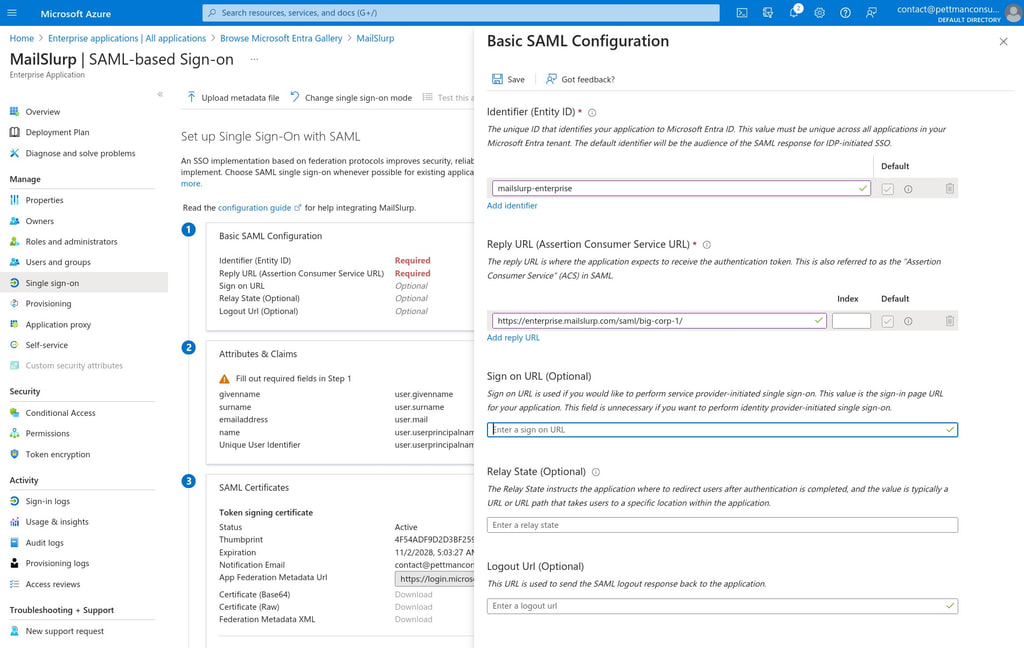
The best path in Entra is to upload the MailSlurp metadata XML from the MailSlurp step 2 panel. If you prefer manual entry, configure these values:
Identifier (Entity ID)using the MailSlurp audience URI.Reply URL (Assertion Consumer Service URL)using the MailSlurp ACS URL.Name ID formatas email address when your tenant policy requires explicit configuration.
Manual entry in Entra looks like this:
4. Copy Entra values back into MailSlurp
From the Entra SAML setup page, paste these values into MailSlurp step 3:
Login URLMicrosoft Entra IdentifierCertificate (Base64)
Logout URL is optional for basic MailSlurp sign-in and can usually be left empty.
5. Assign users and test sign-in
Assign users or groups to the Entra enterprise application, save the configuration in MailSlurp, and test both IdP-initiated and SP-initiated login.
Optional: map Entra roles or groups to MailSlurp roles
MailSlurp can assign organization roles during SAML sign-in by matching SAML assertion claims. This is useful when the same identity provider tenant manages access for several MailSlurp organizations or environments.
Common Entra options are:
- App roles using the claim
http://schemas.microsoft.com/ws/2008/06/identity/claims/role. - Security groups using the claim
http://schemas.microsoft.com/ws/2008/06/identity/claims/groups.
In MailSlurp, create one mapping for each claim value and target role. For example, map the Entra app role MailSlurp.PTEST.User to a MailSlurp PTEST user role, or map an Entra group object ID to a MailSlurp role. Mappings use exact claim names and exact claim values. A user can receive more than one role when their assertion contains multiple mapped values.
If no mapping matches during first SAML sign-in, MailSlurp can use the SAML default role configured for the organization. Use the default role for broad baseline access, and use claim mappings when the IdP should decide which MailSlurp role a user receives.
For Microsoft Entra and Google Workspace walkthroughs with group claims and environment restrictions, see Entra SAML role mapping and Google Workspace SAML role mapping.
For automated create, update, deactivate, and group provisioning from Microsoft Entra ID or another SCIM-capable identity provider, see SCIM provisioning.
Google Workspace setup
1. Select Google Workspace in MailSlurp
Start the SAML create flow in MailSlurp and choose the Google Workspace provider card.
2. Create a custom SAML app in Google Admin
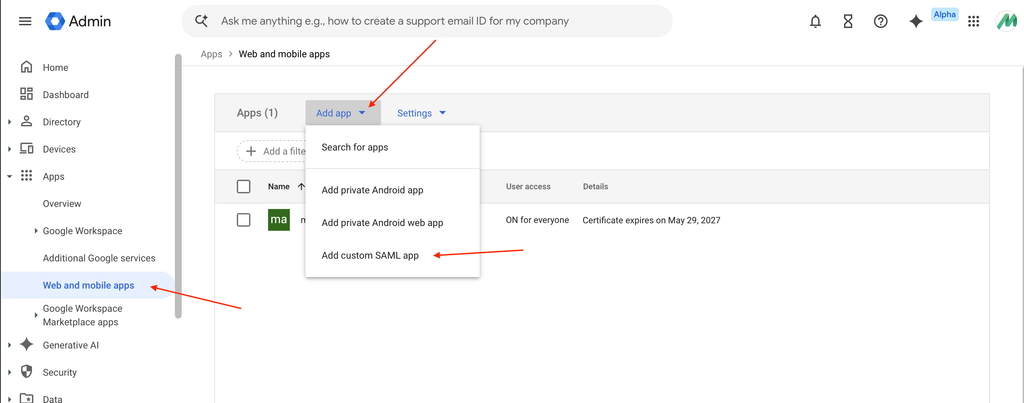
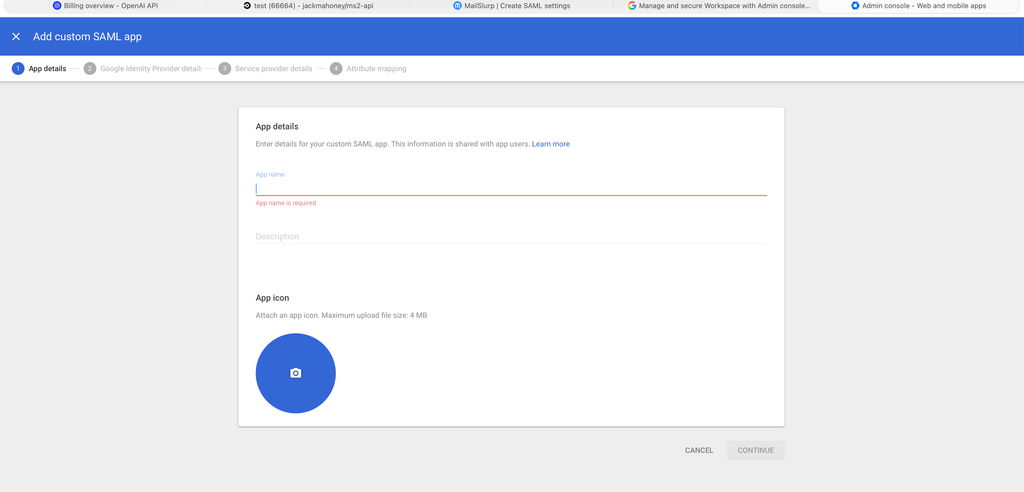
In Google Admin, go to Apps > Web and mobile apps and add a custom SAML app. Enter the app name, optional description, and icon.
Create the custom app in Google Admin:
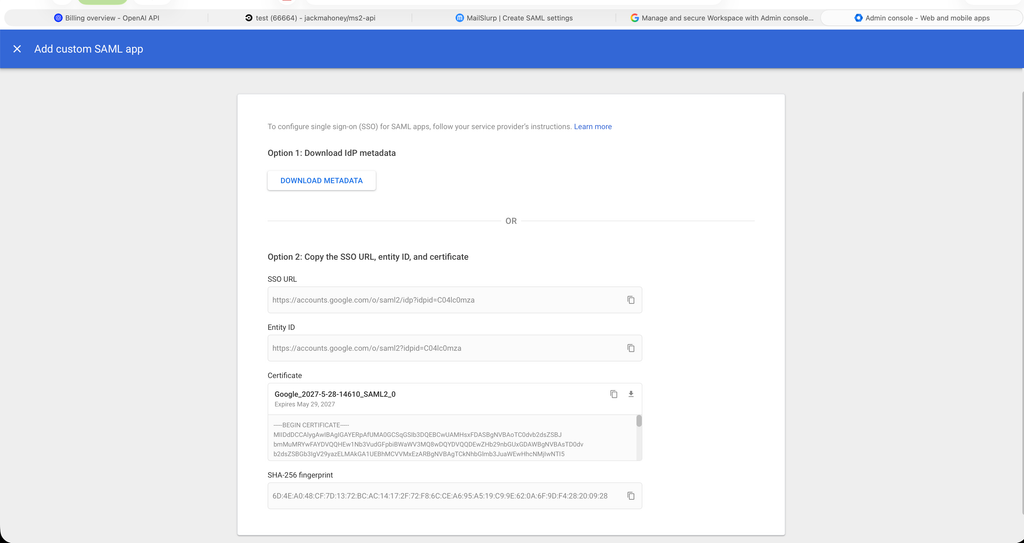
3. Copy Google IdP details for later
In the Google wizard, the identity provider details step gives you the values MailSlurp needs later. Copy or download these values:
SSO URLEntity IDCertificate
Google IdP details step:
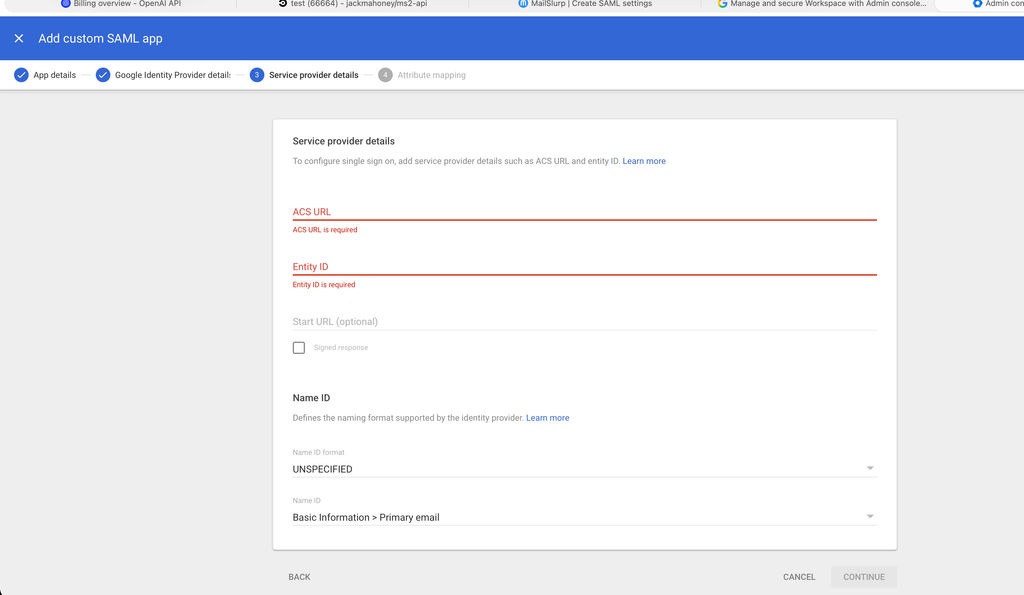
4. Enter MailSlurp service provider values in Google
In the Google Service provider details step, use the values from MailSlurp step 2:
- Set
ACS URLto the MailSlurp ACS URL. - Set
Entity IDto the MailSlurp audience URI. - Set
Name ID formatto email address. - Set
Name IDto the user's primary email address. - Leave
Start URLempty unless you need a custom SP-initiated launch URL.
Google service provider details step:
Use Attribute mapping only if your organization requires extra SAML attributes beyond the email identifier.
Google attribute mapping step:
For environment-specific access, map Google Workspace groups to MailSlurp roles using the groups SAML attribute. See Google Workspace SAML role mapping for the full group-to-environment walkthrough.
5. Paste Google values back into MailSlurp
Return to MailSlurp step 3 and paste:
SSO URLEntity IDCertificate
6. Turn the app on and test sign-in
Assign the app to the required organizational units or groups in Google Admin, save the configuration in MailSlurp, and test sign-in before disabling email login.
Okta setup
1. Select Okta in MailSlurp
Start the SAML create flow in MailSlurp and choose the Okta provider card.
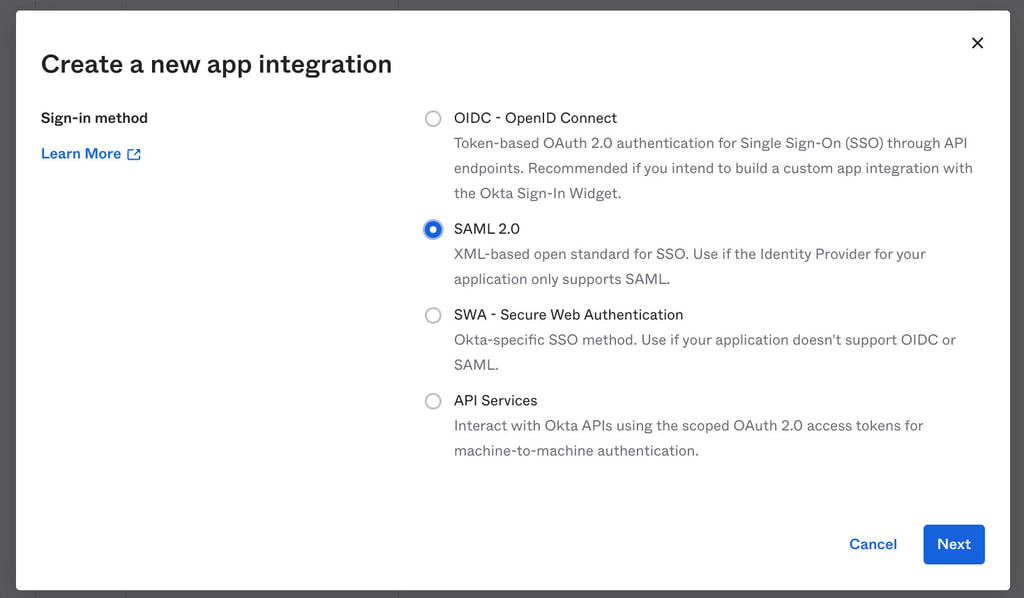
2. Create a SAML 2.0 app integration in Okta
Create a new app integration in Okta using the SAML 2.0 sign-in method.
In Okta, add the application like this:
Then complete the SAML field configuration:
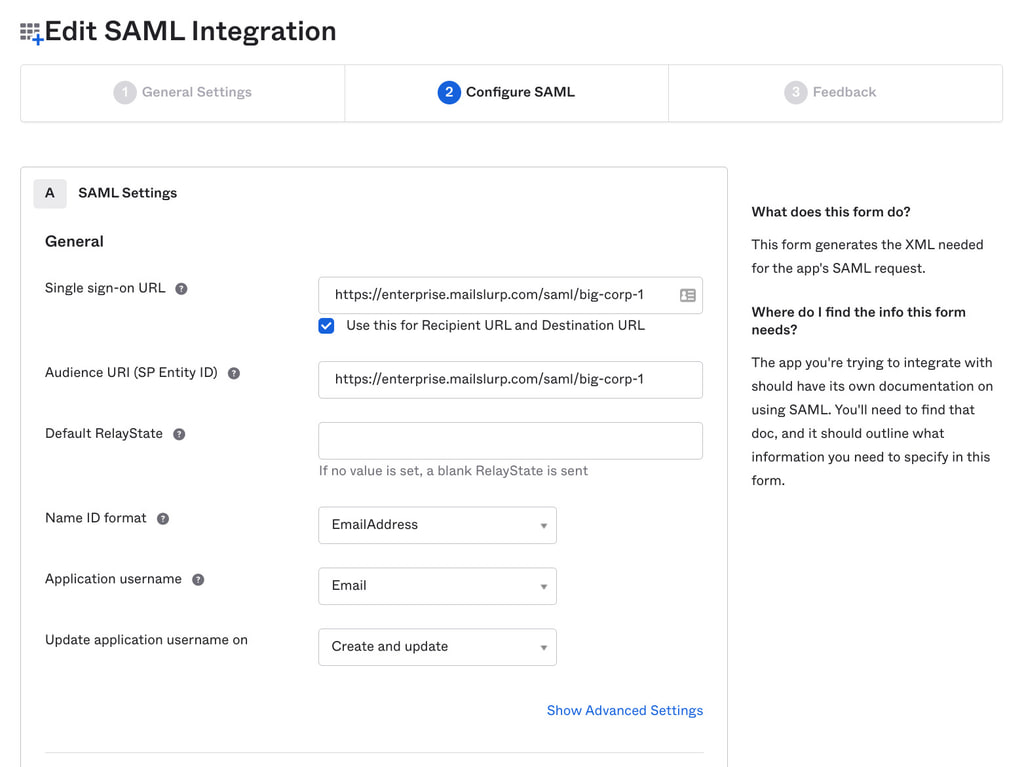
Use the MailSlurp values from step 2 for:
Single sign-on URLAudience URI (SP Entity ID)Name ID formatasEmailAddressApplication usernameas email
3. Copy Okta values back into MailSlurp
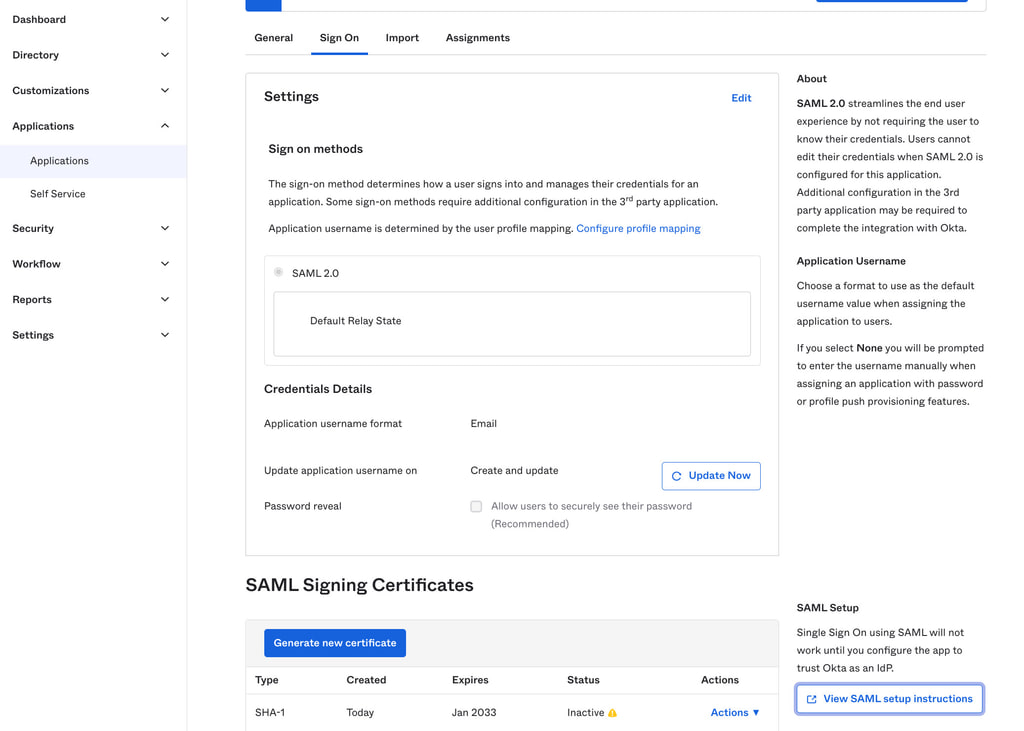
On the Okta sign-on tab, open the setup instructions and copy the IdP values.
In Okta, setup data can be located like this:
Typical IdP setup values look like this:
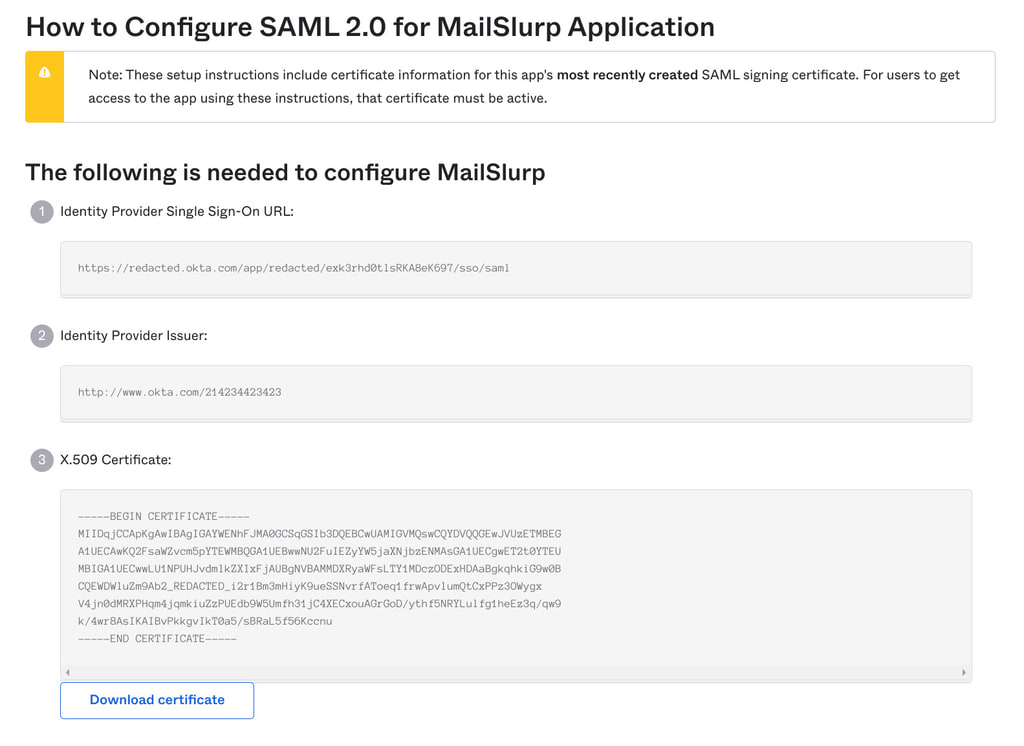
Paste these values into MailSlurp step 3:
Single sign on URLIssuerX.509 certificate
4. Assign users and test sign-in
Assign the application to the correct people or groups in Okta, save the MailSlurp configuration, and test login from both the Okta app tile and the MailSlurp login URL.
For a dedicated Okta walkthrough see the Okta guide.
Custom SAML 2.0 setup
Use Custom SAML 2.0 for identity providers that are not listed in the guided setup, such as ADFS, Ping, OneLogin, JumpCloud, Cognito, or another generic SAML provider.
1. Select Custom SAML 2.0 in MailSlurp
Start the SAML create flow in MailSlurp and choose the Custom SAML 2.0 provider card.
2. Create a generic SAML application in your IdP
Create a new custom or non-gallery SAML application in your provider.
3. Configure the MailSlurp service provider values
Use the MailSlurp step 2 panel to populate the service provider fields in your IdP:
ACS URL, preferably using the HTTP-POST binding.Entity IDorAudience URI.Name ID formatas email address.- Optional metadata XML import if your provider supports metadata uploads.
4. Copy your IdP values back into MailSlurp
Paste the identity provider values into MailSlurp step 3:
SSO URLorLogin URLIssuerorEntity IDSigning certificate (X.509)
5. Use advanced settings only when required
MailSlurp includes advanced compatibility fields for providers that need them. Only change these if your provider requires non-default values:
- Authentication request binding
- Sign authentication requests
- Require signed assertions
- AuthnContext
- Digest algorithm
- Signature algorithm
- Private key or response-signing settings
6. Save and test sign-in
Save the configuration in MailSlurp and verify the login flow with a real assigned user before you enforce SSO-only access.
Save and test login
After provider-specific configuration is complete:
- Save the SAML integration in MailSlurp.
- Test IdP-initiated login from your identity provider app tile.
- Test SP-initiated login from the MailSlurp enterprise login URL.
- Disable email login only after both flows are working.
You can launch the SAML app from the organization page:

Login flows
- IdP-initiated login via your identity provider app tile.
- SP-initiated login via
https://enterprise.mailslurp.com/login?slug=<YOUR_SLUG>. - Organization finder fallback via
https://app.mailslurp.com/organization/<YOUR_SLUG>if enabled.
Organizations, environments, and SSO
SAML settings belong to a MailSlurp organization. If you model each environment as a separate organization, configure SAML for each organization and assign users or groups to the corresponding IdP application access.
For a single Entra tenant, you can use one MailSlurp enterprise application per organization, or reuse the same tenant-level identity source with different app-role or group assignments. The important part is that each MailSlurp organization receives assertions for the correct organization slug and that any role mappings use claim values that are unique enough for that environment.
If you keep several environments inside one MailSlurp organization, map IdP claims to MailSlurp roles first, then restrict each environment grant to the matching role. For example, an Entra app role or group for MailSlurp.PTEST.User can map to a PTEST user MailSlurp role, and the PTEST environment grant can be limited to that role. Users without the mapped role can still sign in to the organization if allowed, but they will not see or switch into that restricted environment.
Use separate organizations when you need separate SAML configurations, separate custom domains, or a stronger administrative boundary. Use environments with role-restricted grants when one organization should centrally manage DEV, PTEST, STEST, and VTEST while still limiting who can enter each environment.
For provider-specific walkthroughs of this pattern, follow Entra SAML role mapping or Google Workspace SAML role mapping.
Troubleshooting checklist
- Verify the organization slug matches the configured provider app.
- Confirm the certificate is valid and unexpired.
- Check NameID format and email identifier mapping in both the IdP and MailSlurp.
- Ensure the user is assigned to the IdP app before testing.
- Confirm role-mapping claim names and values match the SAML assertion exactly.
- If email login is disabled, verify SAML login first to avoid lockout.
- Change advanced compatibility fields only when your IdP requires them.
- Contact support if assertion validation still fails after configuration review.